
Soap Making
My Favorite Mix (Last made 11/7/25):
Have mini spray bottles of isopropyl alochol ready, as well as vinegar. The alcohol sets the soap once in the mold, and the vinegar helps neutralize any spills or droplets.
Ingredients for Total Oils: 32 oz (907g), 2 lb
Tallow: 14.4 oz (408g) - 45%
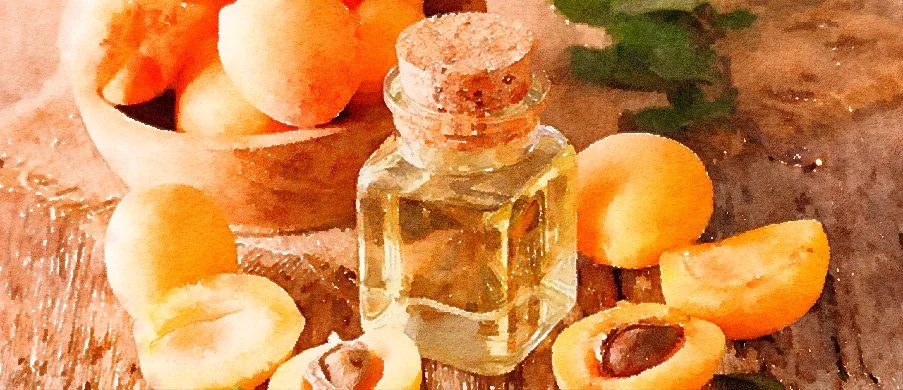
Apricot Kernel Oil: 6.4 oz (181g) - 20%
Coconut Oil: 6.4 oz (181g) - 20%
Cacao Butter: 3.2 oz (91g) - 10%
Castor Oil: 1.6 oz (45g) - 5%
Lye Solution (at 5% superfat):
Sodium Hydroxide (NaOH): 4.35 oz (123.3g)
Water: 10.5 oz (298g)
Steps:
measure out water and lye:
Take outside with safety glasses and gloves to mix the lye- cover and set aside. Try not to breathe it in! You will notice it…
Measure out and melt tallow and coconut oil- to JUST liquid state
Once down to around 100F, add in the cacao and castor oil.
Reserve some apricot for 90F, for adding in the goats milk powder.
Blend oils with hand mixer, set aside to cool
Wait until both batches (lye and tallow mixes) are cooled to around 86F, 88F each (about 90, within 10 degrees of one another)
mix each separatley.
When ready to add the lye to the tallow mix, sieve lye into oil to remove undesolved powders
can add 2 Tbs honey or turmeric, etc.
blitz until can see the tracing of liquid.
spray with vinegar to deactivate lye
prepare mold by spraying with isopropyl alochol
pour into mold on top of spatula
careful mix, clean off spatula
quick wipe of clean up
bang to remove air bubbles
make pattern
spray on top with the alcohol
2 rods and add lid so nothing falls in. Place in fridge. wait 24 hours
24 hours later:
carefully remove from mold (gloves on)
tidy up edges with hand cutter thing.
cut soap (or remove from mold)
wipe cutter clean between cuts
cure 4-6 weeks, due to unreacted lye.
spray one more time with alcohol when setting out to dry, open to air on all sides.
Alternative superfat options:
3% = 4.45 oz lye (harder bar, slightly less conditioning)
7% = 4.25 oz lye (more conditioning, slightly softer)
8% = 4.20 oz lye (very conditioning, can feel greasy)
This percentage number means the amount of soap left untreated by the lye.
This soap is great for gentle cleansing without stripping oils. It is perfect for sensitive skin and daily use, and is great for face and body.
This recipe (which is high in hard oils like tallow, coconut oil, and cocoa butter, and includes powdered goat's milk) uses a cooler-than-average temperature range. While this soap will be safe to use at 4 weeks, the Creamy Lather and Hardness will peak around 6-8 weeks. The longer cure time allows the water to evaporate fully and the saponification process to complete for a truly long-lasting, superior bar.
Goats Milk Details
Adding powdered goat's milk is one of the easiest ways to incorporate the conditioning benefits without the hassle of freezing liquid milk. Many studies and anecdotes say the benefits from fresh and powdered goats milk are nearly identical (I just like the idea of raw goats milk!!), it is totally okay if you do not have goats, or access to fresh milk, to go ahead and use the powder- esp in soap!
The key with powdered milk is to ensure it dissolves completely and to prevent the sugars in the milk from scorching (turning brown/yellow) when they react with the heat of the soap batter.
The recommended usage rate for powdered goat's milk in cold process soap is 1 to 2 tablespoons (TBSP) per pound of oils. This is a 2 lb batch, so I used 3 Tbs of goats milk, mixed into the apricot oil.
When to Add the Powdered Goat's Milk. The goal is to avoid clumping and scorching.
This is the preferred method: Take the 3 Tablespoons of goat milk powder and mix it with 1 to 2 Tablespoons of one of your reserved liquid oils (like Apricot Kernel Oil) that has already been measured out.
Mix this vigorously with a mini-whisk or spoon until you have a smooth, thin paste (a "slurry") with no lumps.
Add at Light Trace: Make your soap as usual. Once your soap batter reaches a light trace (the consistency of thin pancake batter), stir in your prepared slurry of goat milk powder.
Blend: Use a stick blender for a few quick pulses or a whisk to fully incorporate the slurry into the soap batter, and then proceed with adding your fragrance/essential oil and pouring into the mold.
Once tallow is at 90 degrees, mix the lye and tallow oils all together. Try to keep the lye and tallow mix within 10 degrees of one another, ideally between 80 and 90 F.
Pour out carefully. Spray any items used with the vinegar, and place in the sink for cleaning. Most of the lye should have been activated and cooled down, so it is not as much of a heat danger, but you still don’t want to touch it with bare hands. Using the soap too early- before the 4-6 week drying period, could also cause redness, as the lye has to continue to break down and this also lets the water evaporate into a nice hard bar of soap.
Put in the fridge immediately after. Since i have little kids, and am using cute molds that make the soap look like candy gummies, I put a strap around the fridge to kid-proof it. This is basically a strap with a crank closure.
Because your recipe contains natural sugars from the Goat Milk and Cocoa Butter, which can cause the soap to overheat, you must actively cool the soap after it's in the mold:
Do NOT Insulate: Do not cover the mold with a towel, blanket, or cardboard.
Refrigerate for about 24 hours. This cooling will prevent the soap from going through a hot "gel phase," which is what causes milk to scorch and turn the soap an unpleasant yellow/orange color. Paying close attention to the temperatures will give you the best chance of achieving a lovely, creamy-white or light ivory bar of goat milk soap!
Note: the Apricot oil does give off a fruity scent, so if you don’t want that, go with a more neutral oil like olive. I thought it was subtle enough. The cacao is wonderful on its own. I am using the leftover vanilla beans strained from the whipped balms, so those beautiful speckled seeds do not go to waste here!
Recipe Structure:
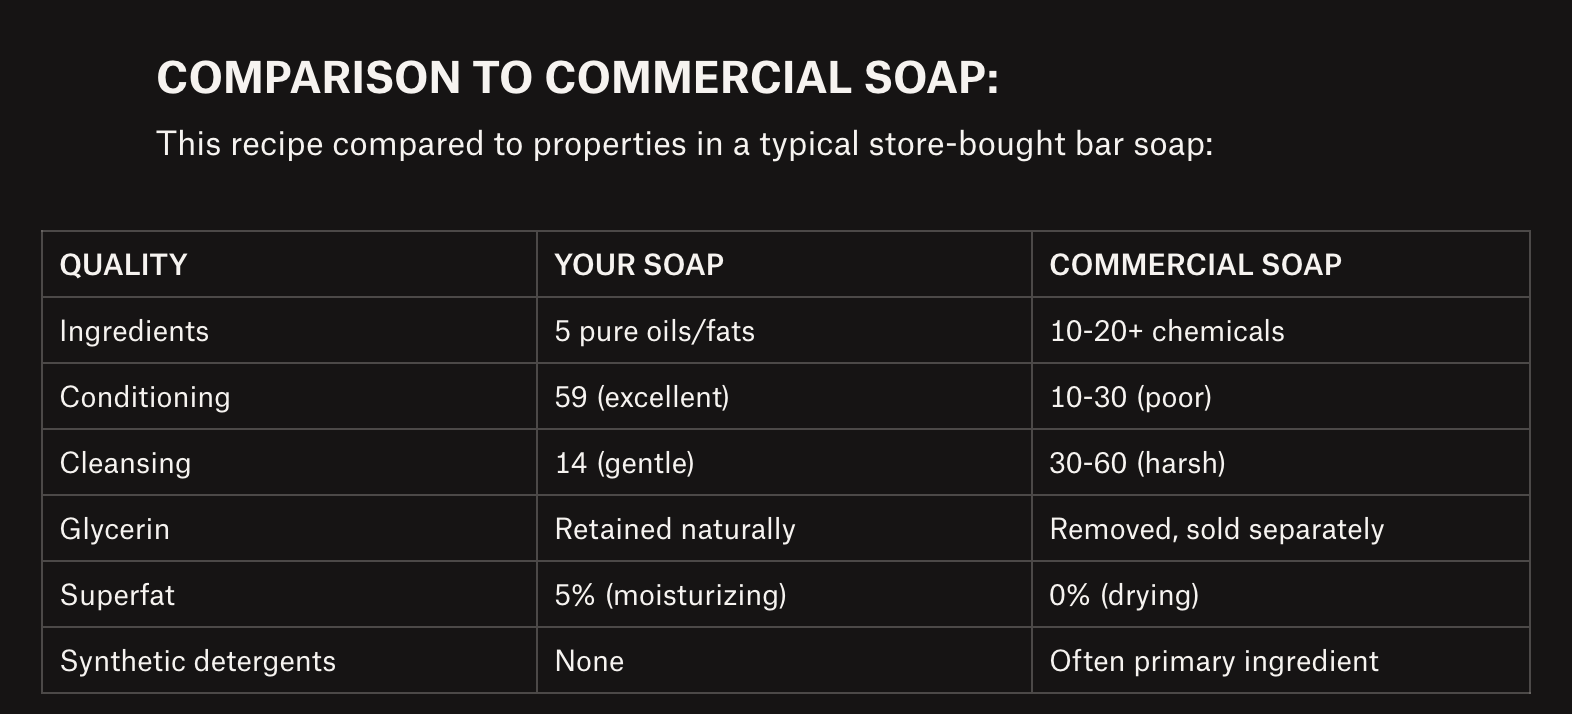
The 45% Tallow provides an incredible boost to hardness and creamy lather.
The 20% Coconut Oil is perfectly calibrated. It provides enough cleansing and bubbly lather without being harsh or drying.
The high Conditioning (59) and Creamy Lather (48) values, driven by the Tallow, Apricot Kernel Oil, and Cacao Butter, will result in a luxurious, skin-loving bar.
The next things I would try are adding clay and or/oatmeal.
For a 32 oz Recipe, you could add:
2 Tablespoons finely milled oat flour (1 TBS per pound of oil)
for incredibly soothing and conditioning properties. Great for sensitive skin
Add at Light Trace or earlier (mix into oils like we did for the goats milk), melted into the oils
You MUST use colloidal oatmeal or grind your oats until they are a very fine, silky powder. You do NOT want it scratchy or rough, or to settle at the bottom. The goal is for the oatmeal to be suspended evenly. You can achieve this by grinding regular rolled oats multiple times in a blender or coffee grinder, then sifting out any large pieces.
Oatmeal can slightly speed up trace, so have your mold and all your other additives ready to go once you start stick blending.
2 Teaspoons (tsp) (1 tsp per pound of oil)
Before the lye solution, mixed into water.
It usually comes very find, so no need to grind.
Before starting your batch, mix your 2 teaspoons of rhassoul clay with 1 tablespoon of distilled water (or a small amount of water reserved from your recipe) until you have a smooth, lump-free paste.
Add the clay slurry to your melted and cooled oils and mix well with a whisk or stick blender before adding the lye solution
Clays also accelerate trace, so be ready before mixing.
The Art of Crafting Divine Tallow Soap: A Guide to Small-Batch Luxury
There's something magical about making your own soap. It's part science, part artistry, and entirely rewarding. Whether you're creating thoughtful gifts for loved ones, learning to homestead and care for yourself with wholesome ingredients, or building a small business at your local farmers market, this grass-fed tallow soap recipe is your gateway to all three.
Let me take you on a journey through this beautiful recipe—why each ingredient matters, how they work together in perfect harmony, and why you'll fall in love with the process of creating something truly divine with your own hands.
Why Tallow Soap? The Renaissance of an Ancient Tradition
For centuries, our ancestors made soap from what they had: animal fats and wood ash. Tallow soap wasn't just practical—it was luxurious, gentle, and incredibly nourishing for the skin. Then the industrial age arrived, and suddenly everything was about cheap vegetable oils and synthetic detergents.
But here's what our great-grandmothers knew: tallow makes exceptional soap.
Today, we're rediscovering this wisdom. Grass-fed tallow is experiencing a renaissance, and for good reason. It's sustainable, nutrient-dense, and creates bars of soap that rival anything you'd find in a high-end boutique.
When you make tallow soap, you're not just making soap—you're connecting with tradition, embracing sustainable living, and creating something your skin will absolutely love.
Meet Your Ingredients: The Dream Team
Every ingredient in this recipe has been carefully chosen for a specific purpose. This isn't a random collection of oils—it's a precisely balanced formula where each component plays a vital role. Let's meet the players:
1. Grass-Fed Tallow (45%) - Your Foundation
Why it's the star of the show:
Tallow is the rendered fat from beef, and when it comes from grass-fed, pasture-raised cattle, it's packed with vitamins A, D, E, and K. But what makes it extraordinary for soap?
Structurally similar to human skin oils: Tallow's fatty acid profile closely resembles our own sebum, which means it's incredibly compatible with our skin
Creates hard, long-lasting bars: High in stearic and palmitic acids, which form the backbone of a durable soap
Produces stable, creamy lather: Not big fluffy bubbles, but rich, conditioning foam that feels luxurious
Gentle cleansing: Removes dirt without stripping your skin's natural protective barrier
Cost-effective: Especially if you source from local farms or butchers
Why 45%? This percentage gives you maximum tallow benefits while leaving room for other oils to add their special qualities. It's the perfect balance—enough to be the foundation, but not so much that you miss out on the magic of complementary oils.
2. Cacao Butter (10%) - Your Luxury Enhancer
The indulgent touch:
Cacao butter is what gives chocolate its melt-in-your-mouth quality, and it brings that same richness to soap.
Extra hardness: Creates bars that last and last
Creamy, conditioning lather: Adds a silky quality to the bubbles
Protective feel: Leaves skin feeling soft without being greasy
Natural chocolate scent: Subtle, warm, and comforting—pairs beautifully with vanilla
Stable and long-lasting: Resistant to rancidity
Why 10%? At this percentage, cacao butter enhances without overpowering. Go too high (15-20%+) and your soap can feel waxy and inhibit lather. At 10%, it's pure luxury with no downsides.
The synergy with tallow: While tallow provides structure and mildness, cacao butter adds that "spa-like" quality. Together, they create a bar that's both practical and indulgent—the best of both worlds.
3. Apricot Kernel Oil (20%) - Your Silk Touch
The gentle conditioner:
Apricot kernel oil is one of those "quiet luxury" ingredients—understated but incredibly effective.
Light and easily absorbed: Similar to olive oil but slightly lighter
Rich in vitamins A and E: Nourishing for all skin types
Creates gentle, silky lather: Soft bubbles that feel luxurious
Perfect for sensitive skin: Mild and non-irritating
Adds conditioning without heaviness: Moisturizes without leaving a film
Why 20%? This is your "soft oils" percentage—oils that condition and moisturize. Apricot kernel oil at 20% provides substantial conditioning without making bars soft or slow to cure. It's the Goldilocks amount—just right.
Don’t have apricot oil? Swaps directly for olive oil 1-for-1 perfectly!
They're extremely similar in soapmaking properties, so it's a seamless substitution.
The homesteader's choice: If you're already infusing oils for balms and salves (like vanilla in jojoba), apricot kernel oil is a beautiful addition to your homestead pantry. It crosses over between skincare and soapmaking effortlessly.
4. Coconut Oil (20%) - Your Lather Builder
The bubble maker:
Coconut oil is soapmaking's workhorse when it comes to creating lather and hardness.
Big, fluffy bubbles: Creates the satisfying lather people expect from soap
Cleansing power: Effectively removes oils and dirt
Rock-hard bars: Adds significant hardness for longevity
Fast trace: Helps soap batter thicken efficiently
Why 20%? Here's where balance is crucial. Coconut oil is amazing, but too much (over 25-30%) can be drying, especially for sensitive or young skin. At 20%, you get all the lather and hardness benefits without any harshness. It's perfect for a family soap that even young boys with active, dirty hands can use daily.
The sweet spot: Combined with the conditioning oils (apricot, cacao, tallow), this 20% creates a soap that cleanses effectively while still being gentle.
5. Castor Oil (5%) - Your Secret Weapon
The lather booster:
Castor oil is soap's unsung hero. You don't need much, but you definitely want it.
Boosts and stabilizes lather: Makes bubbles bigger, fluffier, and longer-lasting
Adds moisture: Humectant properties draw moisture to skin
Increases transparency: Can add a slight translucency that looks beautiful
Improves texture: Makes lather feel creamier
Why 5%? A little castor oil goes a long way. At 5%, it supercharges your lather without any drawbacks. Go above 10-15% and bars can feel sticky or take forever to harden. At 5%, it's pure enhancement with zero compromise.
The magic touch: Think of castor oil as the ingredient that makes all the other oils' lather better. It's not the star—it's the supporting actor that makes the star shine brighter.
The Special Touches: Vanilla Bean Magic
And then there's the vanilla bean seeds—scraped from the pods left over from other infused oil recipes, which otherwise would be filtered out and thrown away (which would be a shame)!
What vanilla beans add:
Visual beauty: Those tiny black specks look artisanal and expensive
Gentle exfoliation: Very mild, barely-there texture
Natural color: Creates gorgeous tan to brown tones (vanilla oxidizes naturally)
Subtle scent: Warm, sweet, comforting aroma
Zero-waste story: Using every part of the vanilla bean is sustainability in action
The chocolate-vanilla pairing: Combined with the natural chocolate scent from cacao butter, you've created an unscented soap that smells like a treat—without any added fragrance oils or essential oils. It's naturally scented luxury.
The Benefits: What Makes This Soap Divine
When all these ingredients come together in perfect harmony, here's what you get:
For Your Skin:
✨ Gentle enough for sensitive skin - No harsh detergents or drying ingredients ✨ Conditioning without being greasy - Cleanses while respecting your skin barrier ✨ Suitable for all skin types - From dry to oily, young to mature ✨ Face and body friendly - One soap for everything ✨ Free from synthetic fragrances - Perfect for those with sensitivities
For Your Shower:
✨ Long-lasting bars - Won't melt away after a few uses ✨ Rich, creamy lather - Feels luxurious and spa-like ✨ Beautiful to look at - Vanilla specks and natural brown color ✨ Subtle, natural scent - Chocolate and vanilla without being overpowering
For Your Values:
✨ Sustainable ingredients - Grass-fed tallow supports regenerative agriculture ✨ Zero-waste mindset - Using vanilla bean leftovers ✨ Simple, recognizable ingredients - Nothing you can't pronounce ✨ Supporting small farms - When you source quality tallow locally ✨ Chemical-free - Just fats, lye (which transforms completely), and vanilla
Why Making Your Own Soap is Pure Joy
1. It's Incredibly Fun to Make
Soapmaking is like being a kitchen chemist and an artist rolled into one. There's something deeply satisfying about:
Watching the transformation: Clear oils become opaque, creamy soap before your eyes
The sensory experience: The warmth of melting oils, the earthy scent of tallow, the sweet chocolate notes from cacao butter
Creative control: You choose every ingredient, decide on colors (natural vanilla brown!), and determine the final shape
The anticipation: Waiting for your soap to cure is like waiting for bread to rise—you can't rush perfection
The reveal: Cutting into a loaf of soap to see those vanilla specks distributed perfectly is genuinely thrilling
It's meditation in action. The precise measuring, the careful stirring, the mindful pouring—it brings you fully into the present moment.
2. Perfect for Gift-Giving
Homemade soap might be the ultimate gift. Here's why:
It's personal: You made it with your own hands. That means something.
It's useful: Unlike decorative items that collect dust, soap gets used and appreciated daily.
It's luxurious: This isn't basic soap—it's grass-fed tallow, cacao butter, and real vanilla beans. It feels expensive because it is high-quality.
It tells a story: "I made this soap from grass-fed tallow, added cacao butter for luxury, and used the vanilla beans left over from my balm-making." That's a gift with depth.
Gift ideas:
Wedding favors: Wrap in kraft paper with twine—rustic elegance
Teacher gifts: Practical, thoughtful, and appreciated
Holiday presents: Make autumn batches to gift in December
New baby gifts: Gentle enough for the whole family
Housewarming presents: Bundle 3-4 bars in a basket with a loofah
Pro tip: If you're making soap for gifts, start 6-8 weeks before you need them. The 4-6 week cure time is non-negotiable, so plan ahead!
3. The Homesteading Lifestyle: Taking Care of Yourself
Making your own soap isn't just a hobby—it's a form of self-reliance and self-care rolled into one.
What homesteading teaches you:
Self-sufficiency: You're no longer dependent on commercial products. You know exactly what's in your soap because you made it.
Resourcefulness: Using tallow (often inexpensive or even free from butchers), repurposing vanilla beans, sourcing local ingredients—you're learning to work with what you have.
Patience: Good things take time. The 4-6 week cure teaches you to slow down and trust the process.
Connection to materials: You understand where things come from. That tallow was once part of a cow raised on pasture. Those vanilla beans traveled from a tropical farm. You're connected to the whole chain.
Skill building: Soapmaking teaches chemistry, precision, creativity, and problem-solving. These skills transfer to other areas of life.
Mental health benefits: There's something deeply grounding about making things with your hands. In our screen-saturated world, physical creation is therapy.
Financial wisdom: Once you've invested in basic supplies, each batch costs just a few dollars to make. You're saving money while creating superior products.
4. Building a Small Business: Sell at Farmers Markets!
And here's where passion meets profit. This recipe isn't just for personal use—it's absolutely market-ready.
The Magic of Making
In a world of mass production and disposable everything, making soap by hand is a radical act. It's slow. It's intentional. It requires patience, precision, and presence.
And that's exactly why it's so rewarding.
When you hold a bar of soap you made yourself—seeing those vanilla specks, smelling that subtle chocolate-vanilla aroma, knowing exactly what went into it—you're holding more than soap.
You're holding self-sufficiency. Creative expression. Connection to tradition. A gift for someone you love. A product you're proud to sell. A skill you'll have forever.
That's the real magic of this recipe.
So gather your ingredients. Set aside an afternoon. Put on your safety gear and your creative spirit.
It's time to make something divine. 🧼✨

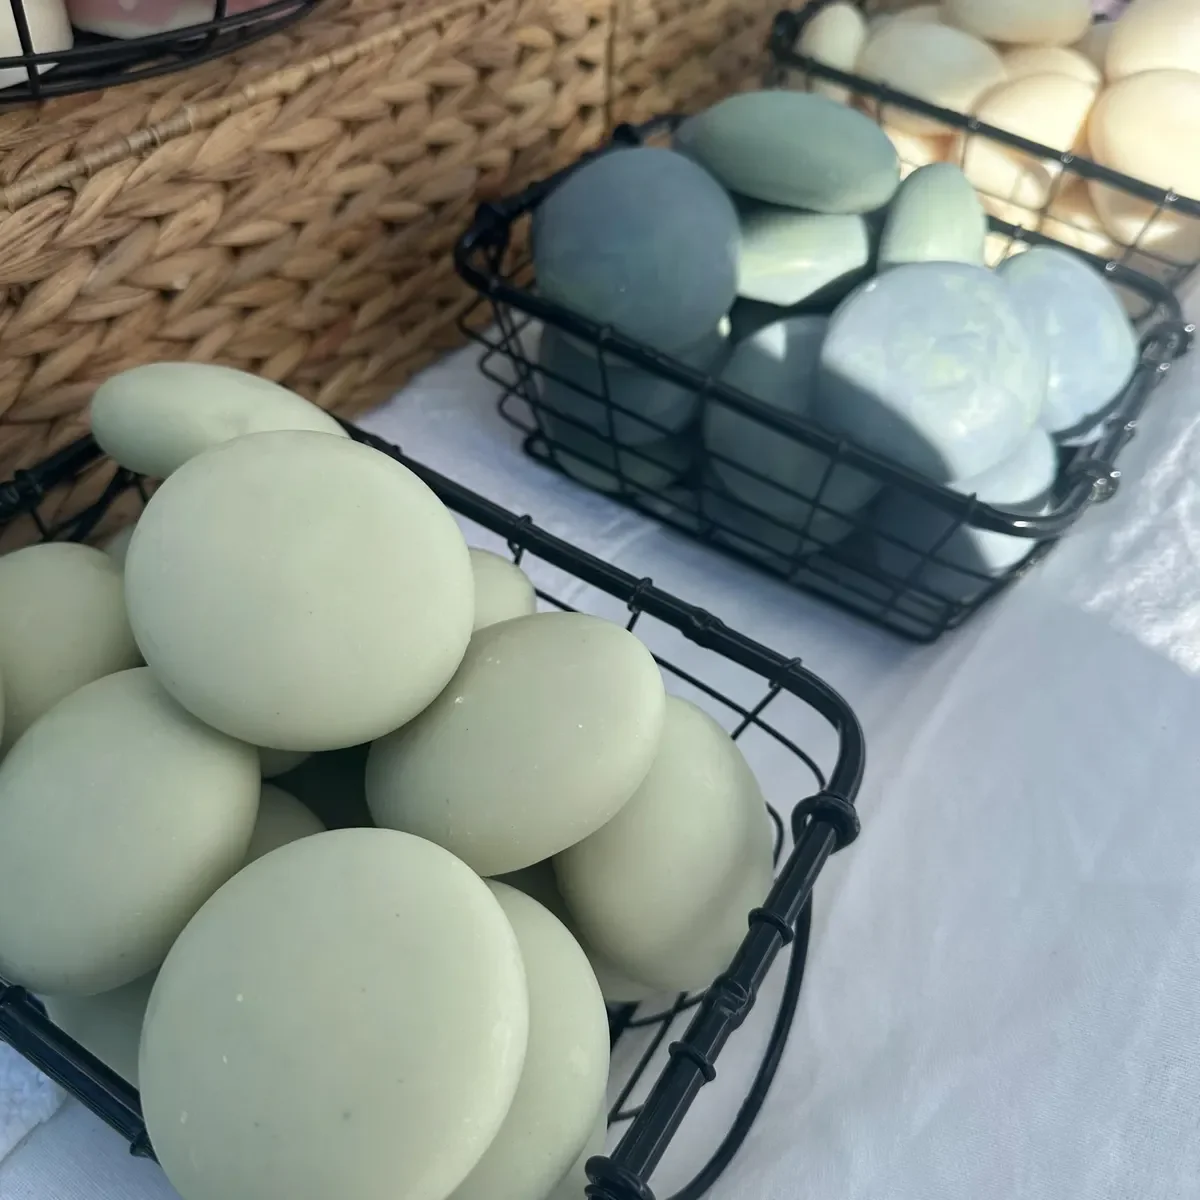


Recipe for 2 lb batch (makes 8-10 bars)
The scariest thing about this is needing Lye to turn the oil into a soap. This is a chemical process that was the main star of the movie fight club- a powder that can burn your skin or blind you with such a tiny amount.
Is it worth making soap if it can actually blind your child?
I almost did not do this many times, but finally decided to go for it, with adequate precaution. I need a designated space, and time, to do this when my kids are not around. And I have to make sure these lock breakers cannot find or open the lye. So these are the items I purchased:
Notes: make sure the lye cannot get wet- that starts the chemical process. You can clean it up with vinegar. If you hide it, make sure it is not too high that it will fall and sprinkle into your eyes. Get eye protection, an apron that can be easily wiped off (not cloth), and long gloves with sleeves. I also got a lockable box for chemicals. In case of an earthquake, ensure your chemicals cannot mix and create an explosion - this is actually possible with some common household cleaning and painting supplies!
Some chemicals, such as chlorine bleach and ammonia, may react, ignite or explode.
Only mix lye outdoors, and make sure children and animals will not be touching or walking on it, barfoot or tracking it indoors with shoes. Cover the working space on the floor, and ensure working outside with the lye. You can heat the oils and fats inside, then bring outside to mix fully.
Measure everything with weight, not by volume: cups/Tablespoons, etc bc air bubbles can get trapped.
Okay, that being said, the steps are pretty simple, not all that different from making tallow butter.
This is actually the first tallow product I adored. I was using the soap unknowingly- something my husband bought, and I assumed was boogey and expensive. Turns out, it was just, simple. I had bought him the whipped tallow butter first, and he loved it, bought it many more times. Then he bought me this, so it comes full circle. My herbalism friends already made me interested in it years back, I just was not ready at the time to do it! Now I am all in.
Then the cooking tallow butter straight on my lips sealed the deal, literally. Research told me it HEALED, not just protected (which most plant compounds do). And I could feel that to be true. Not like the petroleum based products that last forever, this does have a shelf life of about a year, but you will use it up by then - bc it is just so lovely. Surprisingly, the beefy cooking tallow on my lips was not a problem with smell, like it was on my hands. I could use the stuff straight up on my lips.
For the farmer’s market, i thought offering my husband’s portable hand washing station with some tallow soap could show the immediate benefit of the softness of the soap. No fragrance, just so soft and gentle. The lotion is luxurious, and the smell makes me coming back for more, but the soap feeeeeels like something i want to keep touching.
I noticed the benefits of the soap faster than the benefits of the lotion, vs what is typically on the market.
So here it goes. A few versions. I had to have some goat’s milk and honey in the wings, but for now, starting with the skin friendly oils I have on hand this season, since everything I use is perishable. No waste. And I love them all so it is worth using every drop! Even the vanilla beans, are from what would otherwise be discarded. The tallow even, made from the beef fat that no butchers can use. But the cosmetics people run out of their way for.
GRASS-FED TALLOW SOAP WITH CACAO BUTTER & REAL VANILLA BEAN
Complete Instructions for Your First Batch
RECIPE SUMMARY
INGREDIENT AMOUNT TO WEIGH
Tallow (grass-fed) 14.4 oz (408 g) Apricot Kernel Oil 6.4 oz (181 g) Coconut Oil 6.4 oz (181 g) Cacao Butter 3.2 oz (91 g) Castor Oil 1.6 oz (45 g) Sodium Hydroxide (Lye) 4.35 oz (123 g) Distilled Water 10.5 oz (298 g) Vanilla Bean Seeds 1-2 tsp
Makes: 8-10 bars | Cure time: 4-6 weeks
SAFETY FIRST - READ BEFORE STARTING
⚠️ Lye is caustic and can cause chemical burns
Safety Requirements:
Wear safety goggles and gloves throughout entire process
Wear long sleeves and closed-toe shoes
Work in well-ventilated area (open window or turn on fan)
Keep vinegar nearby (neutralizes lye on skin if splashed)
No children or pets in workspace
Have phone accessible in case of emergency
Never leave lye solution unattended
If lye contacts skin: Flush with water for 15 minutes, then apply vinegar If lye contacts eyes: Flush with water for 15 minutes and seek medical attention immediately
EQUIPMENT NEEDED
Essential:
Digital kitchen scale (must weigh to 0.1 oz or 1 g precision)
2 heat-safe containers (glass or plastic - NOT aluminum)
One for lye solution (2-4 cup capacity)
One large pot/bowl for oils (8+ cup capacity)
Stick blender (immersion blender)
Silicone spatula
2 thermometers (or 1 infrared thermometer)
Silicone loaf mold (holds ~2.5 lbs soap)
Spray bottle with isopropyl alcohol (70% or 91%)
Safety gear:
Safety goggles
Rubber or nitrile gloves
Long sleeves
Apron (optional but recommended)
Nice to have:
Towel or cardboard to cover mold
Wire cooling rack for curing
Knife or soap cutter
PREPARATION (Do Before You Start)
Clear your workspace - Remove anything you don't need
Lay out all ingredients - Pre-measure nothing; you'll weigh as you go
Put on safety gear - Goggles and gloves stay on the entire time
Set up ventilation - Open window or turn on fan
Fill spray bottle with isopropyl alcohol
Prepare vanilla beans - Scrape seeds from pods and set aside (pat semi-dry if wet from jojoba)
Make ice - Freeze about 5 oz (half your water) into ice cubes for lye solution
Read through ALL instructions before beginning
STEP-BY-STEP INSTRUCTIONS
STEP 1: MAKE LYE SOLUTION (Do this first - needs to cool)
Timing: 10 minutes active, 30-45 minutes cooling
Prepare ice water:
Put 5-6 oz distilled water in heat-safe container
Add ice cubes made from distilled water until total weight = 10.5 oz
Weigh the lye:
Place small container on scale, tare to zero
Carefully measure 4.35 oz (123 g) sodium hydroxide
Set aside
Combine lye and water (CRITICAL - DO THIS CORRECTLY):
Take lye and ice water outside or to well-ventilated area
ALWAYS ADD LYE TO WATER, NEVER WATER TO LYE
Slowly pour lye into ice water while gently stirring with silicone spatula
Stir continuously until lye crystals completely dissolve (1-2 minutes)
WARNING: Solution will get HOT (150-200°F) and produce fumes - don't breathe directly over it!
Let cool:
Place lye solution in safe spot away from children/pets
Allow to cool to 90-100°F (will take 30-45 minutes)
Insert thermometer to monitor
What it should look like: Clear liquid (may be slightly cloudy at first but will clear as it cools)
STEP 2: PREPARE OILS (While lye cools)
Timing: 15-20 minutes
Weigh solid fats into large pot:
Tallow: 14.4 oz (408 g)
Cacao Butter: 3.2 oz (91 g)
Coconut Oil: 6.4 oz (181 g)
Melt solid fats:
Place pot on stove over LOW heat
Stir occasionally until just melted
Do not overheat - remove from heat as soon as melted
Goal temperature: 90-100°F
Add liquid oils to melted fats:
Remove pot from heat
Weigh and add Apricot Kernel Oil: 6.4 oz (181 g)
Weigh and add Castor Oil: 1.6 oz (45 g)
Stir to combine
Check temperature:
Let oils cool to 90-100°F
Both lye solution and oils should be within 10°F of each other
What it should look like: Clear golden/amber liquid
STEP 3: COMBINE LYE AND OILS (The exciting part!)
Timing: 5-15 minutes
Temperature check:
Lye solution: 90-100°F
Oils: 90-100°F
Within 10°F of each other? Good to go!
Pour lye into oils:
With gloves and goggles still on
Slowly pour lye solution into oil mixture
Pour down side of container (not directly into center to avoid splashing)
Begin mixing with stick blender:
Burp your stick blender first: Tap on bottom of container a few times to release air bubbles
Submerge stick blender completely
Pulse in short bursts (3-5 seconds on, stir, repeat)
Keep blender head fully submerged to avoid air bubbles
Alternate between pulsing and stirring with unpowered blender
Mix to "trace":
Continue pulsing and stirring for 3-8 minutes
"Trace" means: When you drizzle mixture from spatula, it leaves a trail on surface (like thin pudding)
Light trace: Mixture barely coats spatula - PERFECT for adding vanilla beans
Don't over-blend: You want time to add vanilla and pour smoothly
What it should look like: Opaque, creamy, like thin cake batter or pudding
STEP 4: ADD VANILLA BEANS
Timing: 1 minute
At light trace, add vanilla bean seeds:
Sprinkle 1-2 tsp vanilla bean seeds over soap batter
Gently stir by hand with spatula (10-15 stirs)
Seeds will distribute throughout - you'll see black specks
Tip: Don't over-stir or soap will thicken too much
STEP 5: POUR INTO MOLD
Timing: 2-3 minutes
Pour soap batter into silicone loaf mold:
Pour from low height to minimize bubbles
Scrape sides of pot with spatula to get all soap
Tap out air bubbles:
Pick up mold and gently tap on counter 3-4 times
This brings bubbles to surface
Smooth the top:
Use spatula to smooth and level top surface
Don't worry about perfection - rustic is fine!
Spray with alcohol:
Immediately spray top surface with isopropyl alcohol (3-4 sprays)
This prevents "soda ash" (harmless white powder)
Hold bottle 6-8 inches away
STEP 6: INSULATE AND WAIT
Timing: 24-48 hours hands-off
Cover lightly:
Place piece of cardboard or light towel over mold (not tightly sealed)
Do NOT wrap in blankets - cacao butter + vanilla can cause overheating
Place in safe spot:
Room temperature location
Away from drafts
Where it won't be disturbed
Away from children/pets
Wait 24-48 hours:
Soap needs to harden before unmolding
It may get warm (even hot) - this is normal
It may develop cracks on top - this is fine
Do not peek or move for at least 24 hours
What's happening: Saponification (lye + oils becoming soap) continues, generating heat
STEP 7: UNMOLD AND CUT
Timing: 15-20 minutes (after 24-48 hour wait)
Check if ready to unmold (at 24 hours):
Gently press corner - should feel firm like cold butter
If still soft/jiggly, wait another 12-24 hours
Don't rush this - soft soap is hard to cut
Unmold the loaf:
Gently pull sides of silicone mold away from soap
Carefully turn mold upside down
Soap should release easily
If stuck, wait another few hours
Cut into bars:
Use sharp knife or wire cutter
Cut loaf into 8-10 bars (about 1" thick each)
Cuts don't need to be perfect!
Wear gloves - soap is still caustic at this point
Spray cut sides with alcohol:
Lightly spray all exposed cut surfaces
This prevents soda ash on sides
What it should look like: Firm bars with vanilla bean specks throughout, tan/brown color from vanilla
STEP 8: CURE THE SOAP
Timing: 4-6 weeks (mostly hands-off)
Set up curing rack:
Use wire cooling rack, wooden rack, or cardboard lined with parchment
Needs air circulation on all sides
Place in room with good airflow
Arrange bars:
Place bars on rack with space between them
Don't let bars touch each other
Turn bars every few days for even air exposure
Wait 4-6 weeks minimum:
Week 1-2: Soap continues hardening
Week 2-4: Water evaporates, pH drops
Week 4-6: Soap becomes milder and longer-lasting
Do not use before 4 weeks - pH will be too high and harsh
Test when ready:
After 4 weeks, test one bar
Should feel hard and dry
Lathers well, feels mild on skin
If still soft, cure another 1-2 weeks
Ideal curing conditions:
Room temperature (60-75°F)
Low humidity
Good air circulation
Out of direct sunlight
CLEANUP
While soap is still in mold:
Don't wash tools immediately:
Let any residual soap batter sit on tools for 24 hours
It will saponify and become safer to clean
After 24 hours:
Scrape excess soap from tools into trash
Wash tools with hot water and dish soap
Can go in dishwasher
Dispose of paper towels with raw soap in trash (not down drain)
Safety note: Never pour raw soap batter down drain - it can react with pipes
Ingredients list: Saponified oils of Tallow, Apricot Kernel, Coconut, Cacao Butter, Castor, Vanilla Bean
FINAL TIPS FOR SUCCESS
✓ Take your time - Don't rush any step ✓ Measure precisely - Soapmaking is chemistry ✓ Stay safe - Keep gloves and goggles on ✓ Be patient - Curing makes better soap ✓ Don't panic - Most "mistakes" still make usable soap ✓ Have fun - You're making something amazing!
You've got this! Take a deep breath, follow the steps, and enjoy the process.
Good luck with your first batch! 🧼✨
FOR FUTURE BATCHES:
Once you're comfortable with the basic process, you can experiment:
Batch 2: Add honey (0.32 oz, 9 g, or 2 tsp)
Batch 3: Add goat milk powder to melted oils, whisk until dissolved (2-3 Tbsp or 20-30 g)
Batch 4: Add both (full deluxe version)
You're basically making:
4 cups of mixed oils/fats (with tallow being almost half)
1¼ cups water + ⅓ cup lye
Plus a few tablespoons/teaspoons of goodies
RECIPE TOTAL VOLUME:
Raw soap batter: ~46.85 oz (1,328 ml)
Work quickly - you have maybe 5-10 minutes after trace before batter gets too thick
Containers
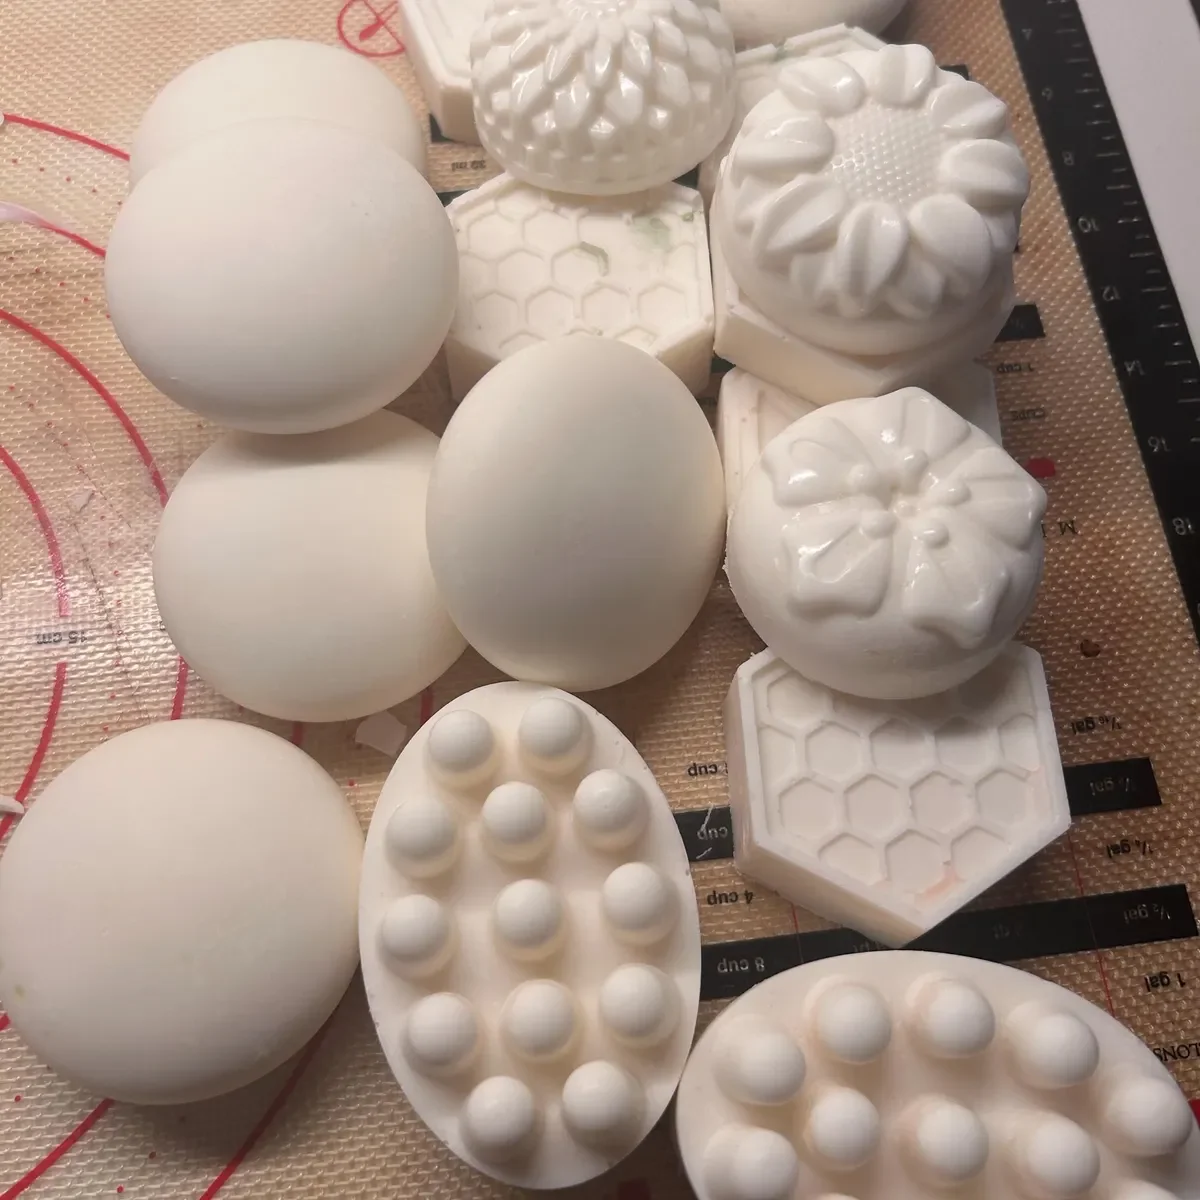
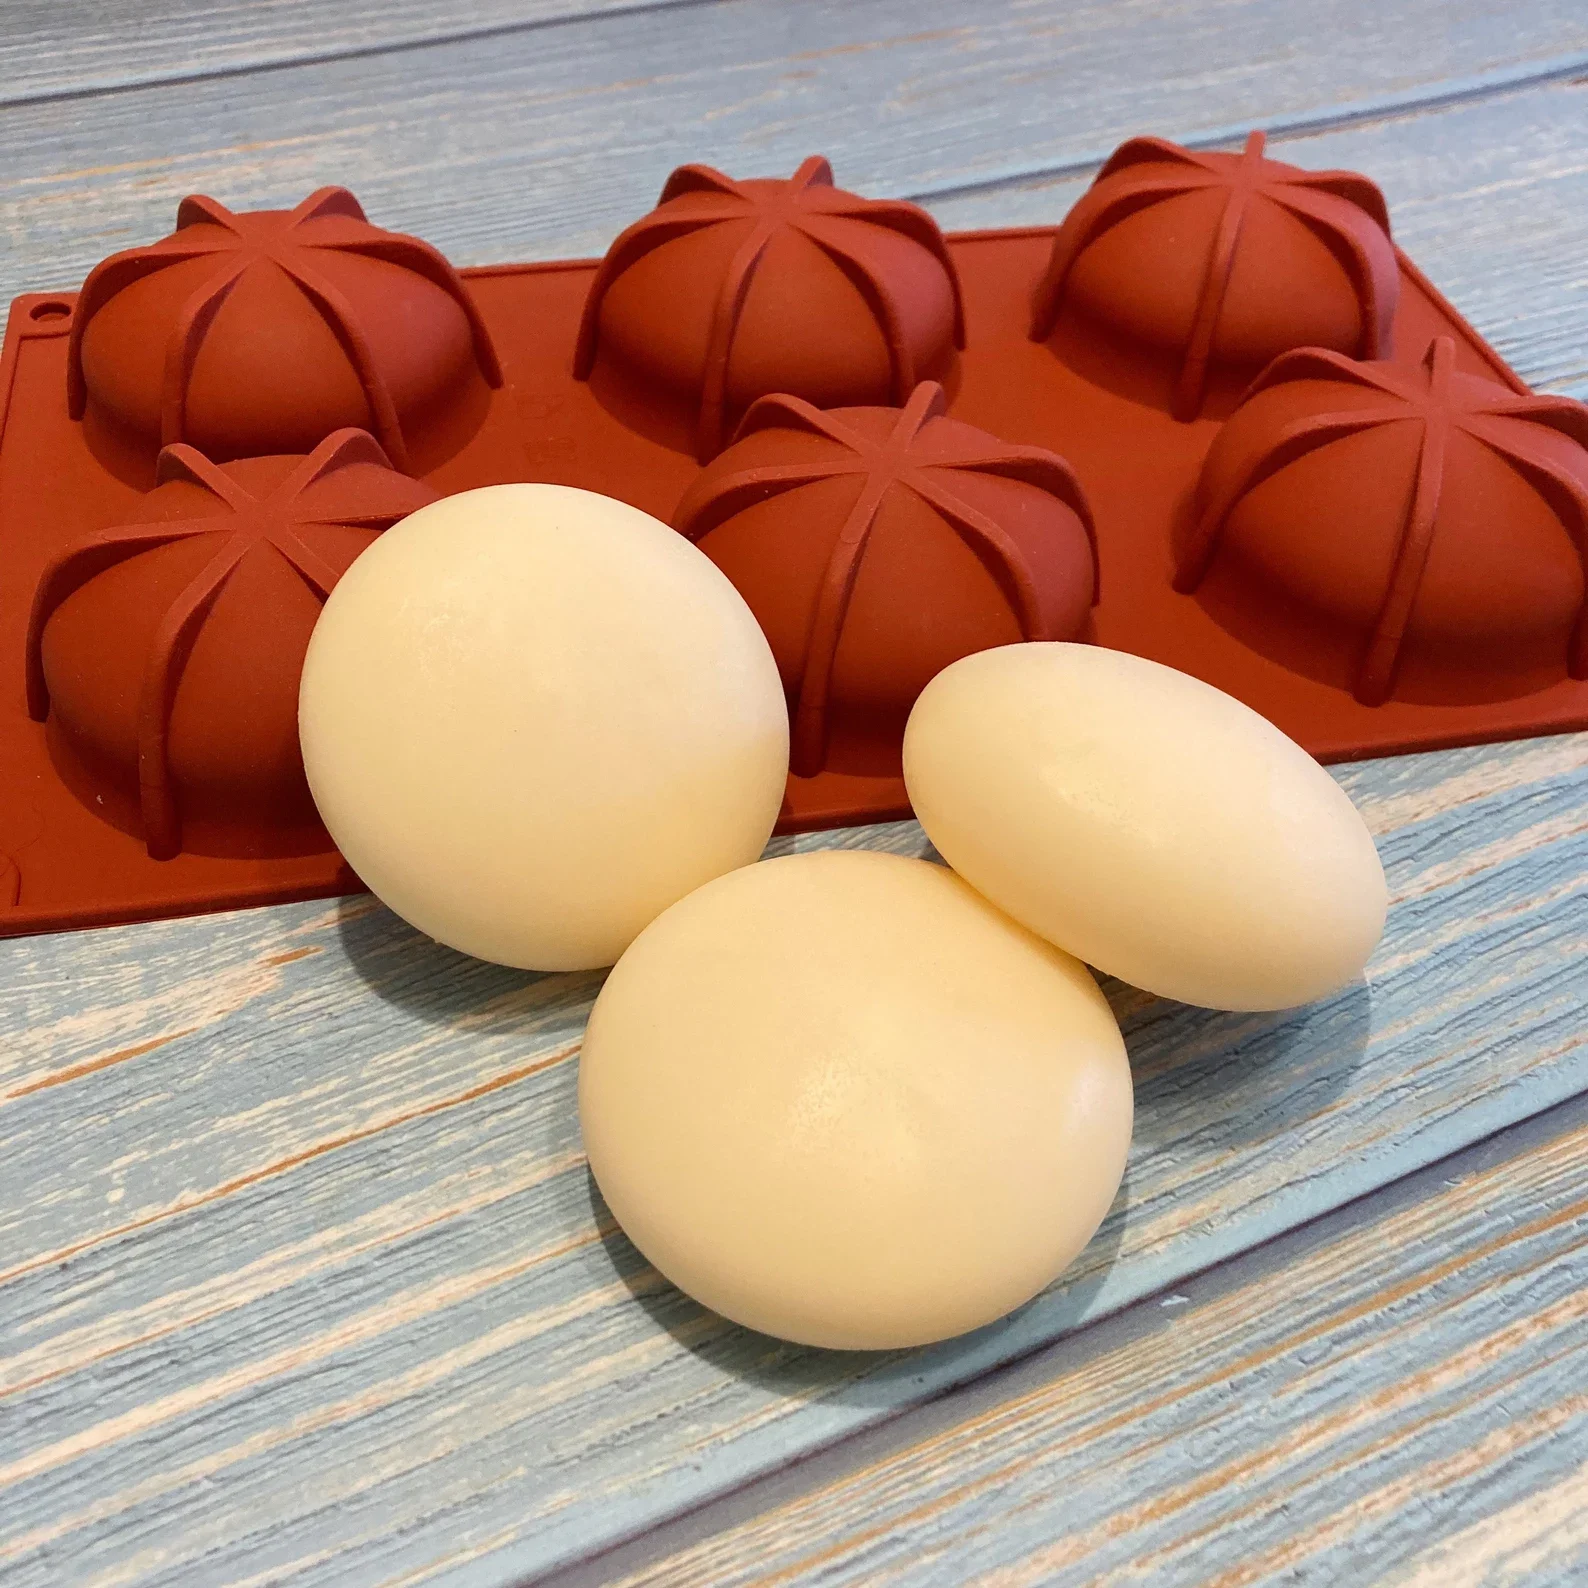
Material : Circular Silicone Molds
6 cavities Dome Circle Cabochon silicone soap mold
Dimension: 11.61"(L) x 6.85" (W) x 1.25" (H)
Dimension of Single Cavity: 2.5" (L) x 2.5" (W) x 1.25" (H)
Finished soap weight (Single Cavity) : 85g -95g
Note: With this recipe above, you can make about 11-12 individual round soaps. (I bought 2x molds to be able to use it all up)
The large one is approx. 11"x 3.5"x 3.4"
Mold capacity: 45 oz, 1200ml (volume)
The recipe above fits perfectly in this mold!
How many bars:
If you cut bars 1 inch thick: 11 bars (11" loaf ÷ 1" = 11 bars)
If you cut bars 1.25 inches thick: 8-9 bars (a bit chunkier)
Most common: 10 bars at about 1.1" thick each
Each bar weight (cured): ~90-100g per bar
The small one is 10.6"x 3"x 3.2"
the volume is 32oz/900ml
full makes 7-8 rectangular bars (~100-115g each)
Filling it, you'd have 14-15 oz leftover (to make other molds, like 3-4 circular soaps)
Tip: Slightly underfill the small loaf (leave ¼" from top) to ensure you have enough leftover for at least 3 full circles!
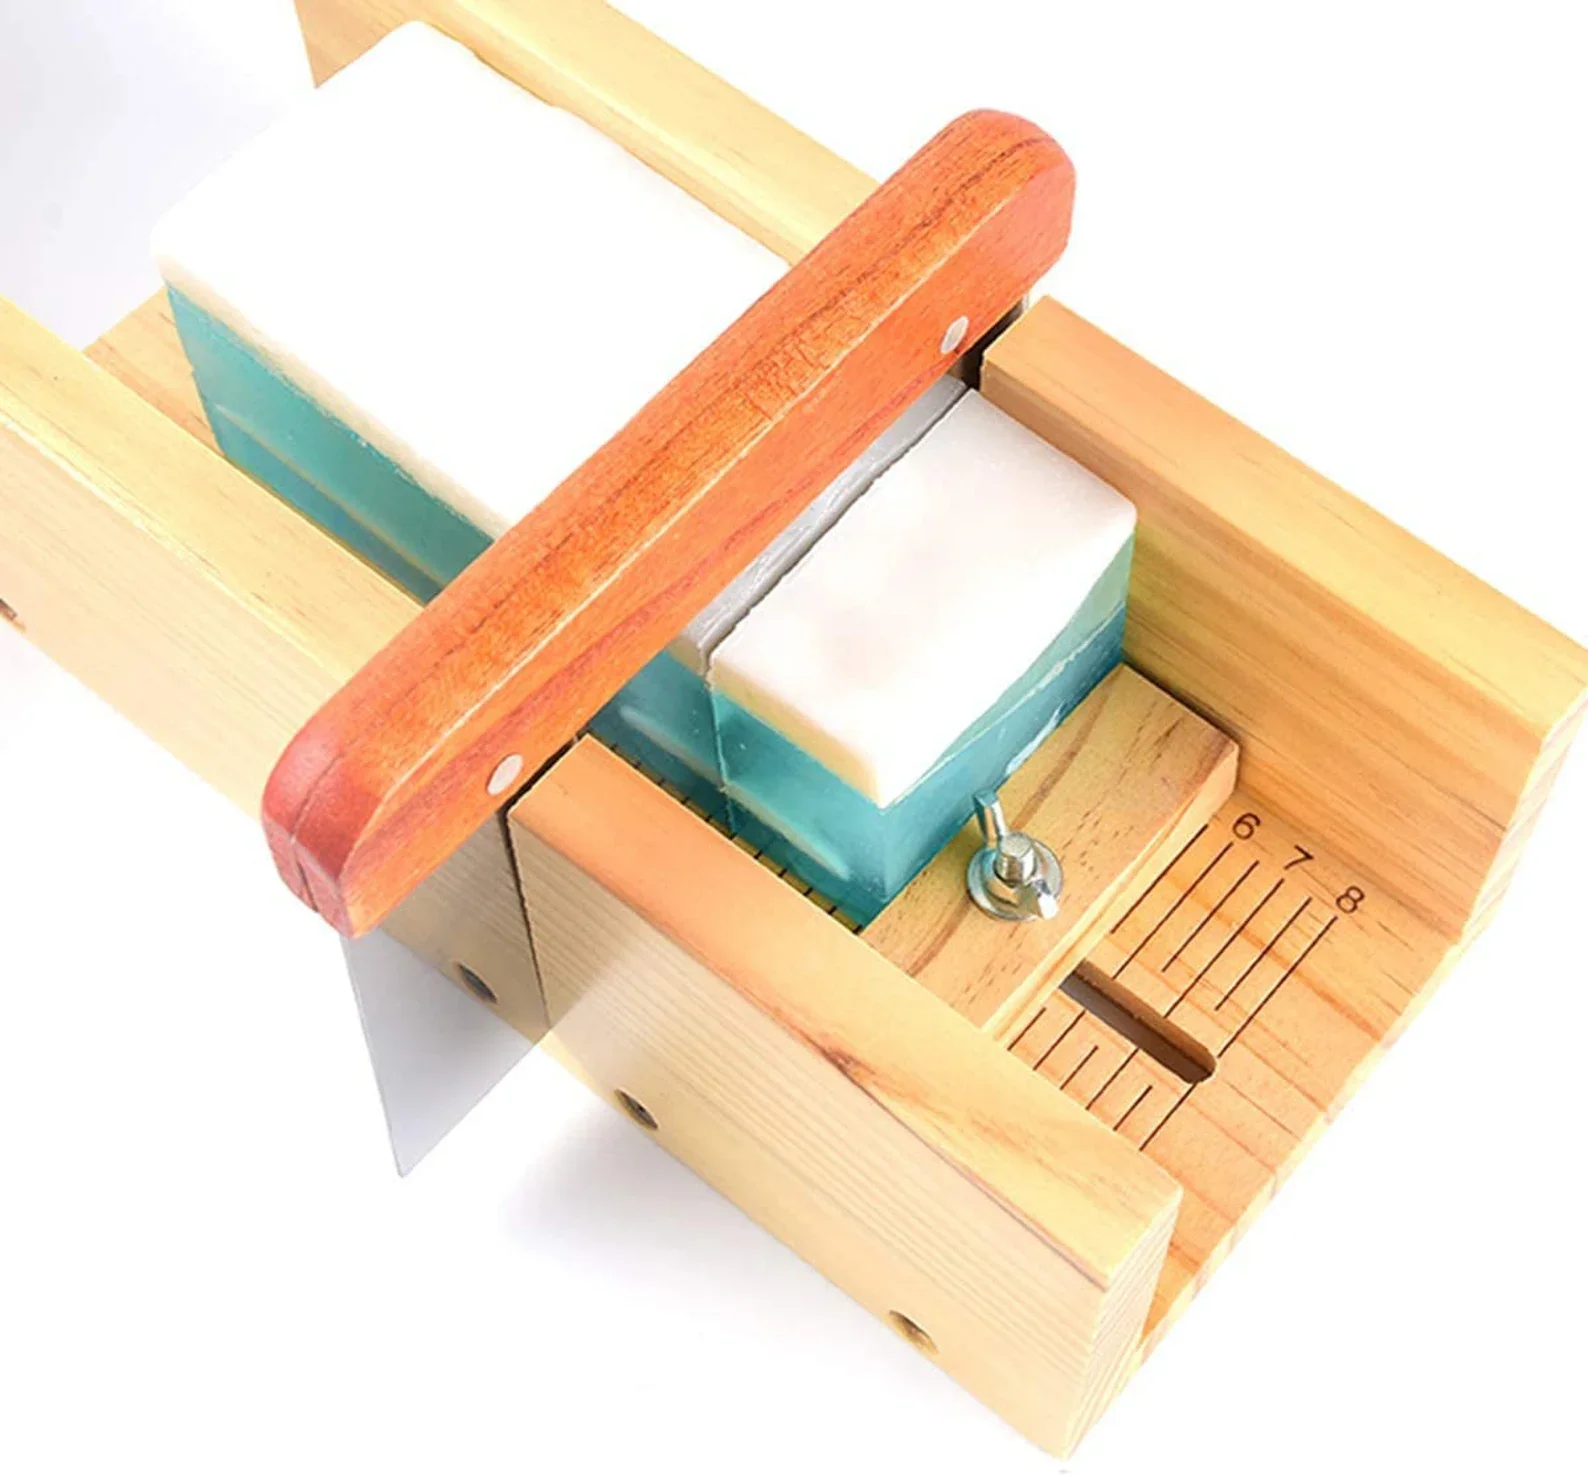
Cutters
Wavy cutter is about: 7.3" x 4.8"
Straight cutter about: 6" x 4.4".
The soap cutter mold is approx.10"x 2.8"x 2.7"
WITH a raw goods start of 7 LBS TALLOW:
you could make:
7 batches × (7-8 rectangles + 3-4 circles) = 49-56 rectangles + 21-28 circles
Total: 70-84 pieces of soap in mixed shapes!