
Natural Toothpaste Recipes
Tooth Powder + Gel versions | Adult mint + Kids fun flavors All formulas include nano-hydroxyapatite for cavity prevention and remineralization
Why DIY Solves the Heavy Metal Problem
The heavy metals found in commercial toothpastes (including Boka) come from poorly sourced mineral ingredients — not from nano-hydroxyapatite itself. The ingredient is genuinely excellent and the research is strong. DIY with pharmaceutical or food-grade sourced n-HA gives you all the benefit with none of the contamination risk.
What Nano-Hydroxyapatite Does
Hydroxyapatite is literally what teeth are made of — 97% of enamel and 70% of dentin. When applied topically it:
Fills microscopic fissures and early cavity lesions
Remineralizes enamel after acid exposure
Reduces sensitivity by occluding exposed dentin tubules
Performs comparably to fluoride for cavity prevention — some studies show it outperforms fluoride on early enamel lesions
Is completely biomimetic — the body knows exactly what to do with it
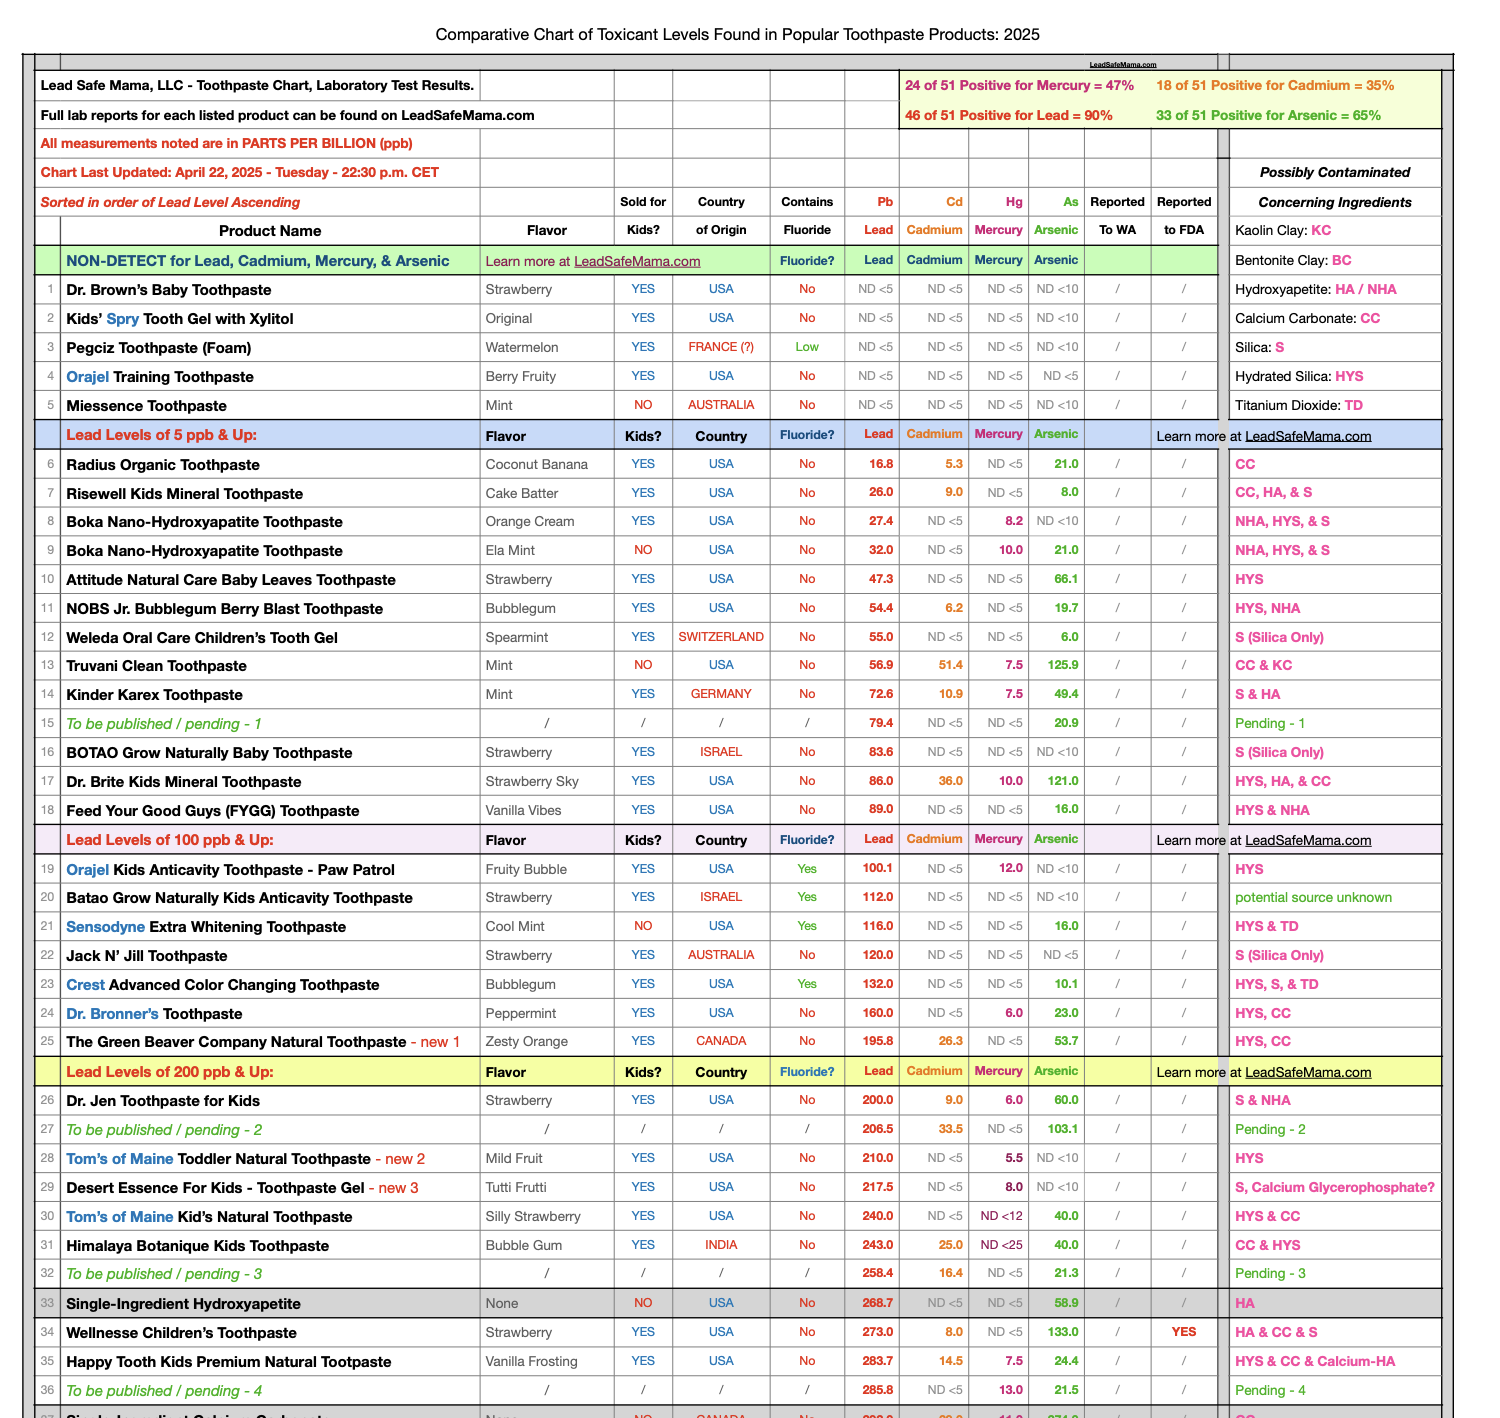
Lead Safe Mama Toothpaste List of Tested Items. Few pass. None with hydroxyapatite pass.
Incorporation tip: Always pre-mix n-HA with a small amount of glycerin or coconut oil into a smooth paste before adding to your main batch. It's a very fine powder that clumps if added dry — pre-wetting ensures even distribution.
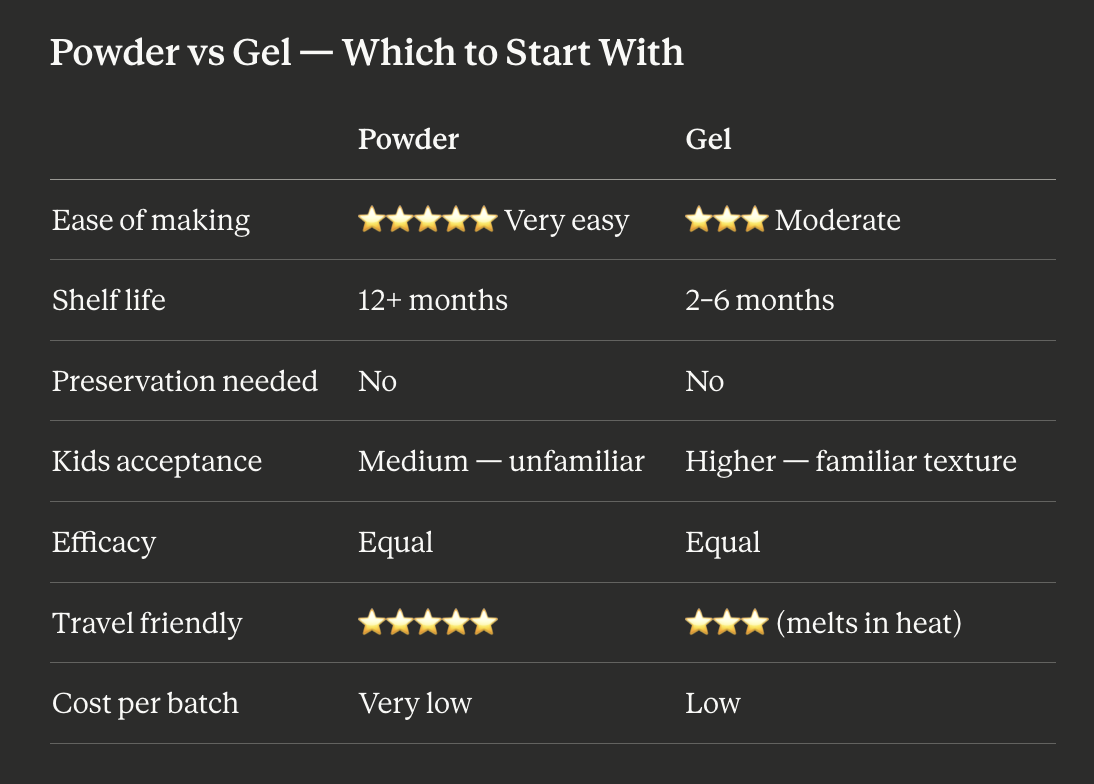
Formulas 1 & 2: Tooth Powder — Adult + Kids
Same base, different flavor profiles | 60g batch each Simplest to make | Longest shelf life | No preservation needed
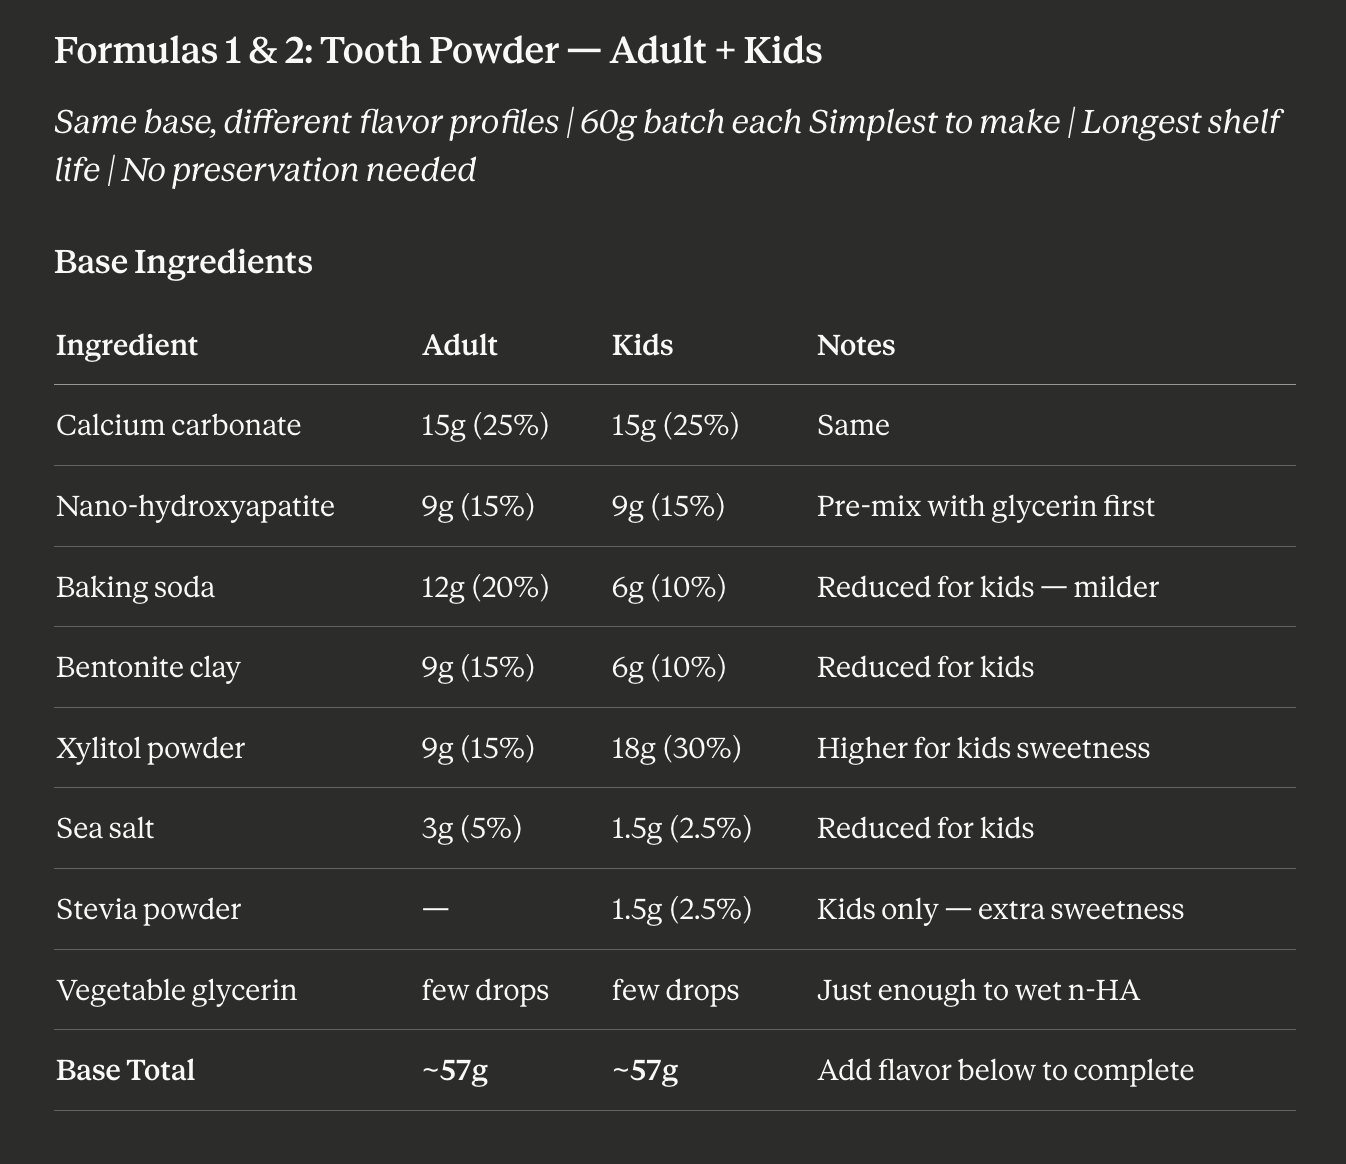

Note: No clove for kids — too strong. Water-soluble extracts like Harvest Moon strawberry work in powder only, not gel.
Instructions — Both Powder Formulas
Step 1 — Pre-mix n-HA Add 9g nano-hydroxyapatite to a small bowl with 3–4 drops vegetable glycerin. Stir into a smooth paste with no dry clumps. Set aside.
Step 2 — Combine dry ingredients Combine all dry ingredients for your chosen formula (adult or kids) in a bowl. Whisk thoroughly until completely uniform.
Step 3 — Add n-HA paste Add the n-HA glycerin paste to dry ingredients. Mix thoroughly using a fork or small whisk until fully distributed with no clumps.
Step 4 — Add flavoring Add essential oils or CO2 extracts drop by drop while stirring constantly. Mix thoroughly until evenly distributed throughout — no pockets of concentrated oil.
Step 5 — Bottle Powder should be uniform, slightly off-white, fine-textured. Store in a small glass jar with tight lid. Keep completely dry — no wet spoons or brushes dipped in.
How to Use: Dip damp toothbrush into powder or pour small amount into palm. Brush 2 minutes. Spit. No rinse needed.
Shelf life: 12+ months in a dry sealed jar
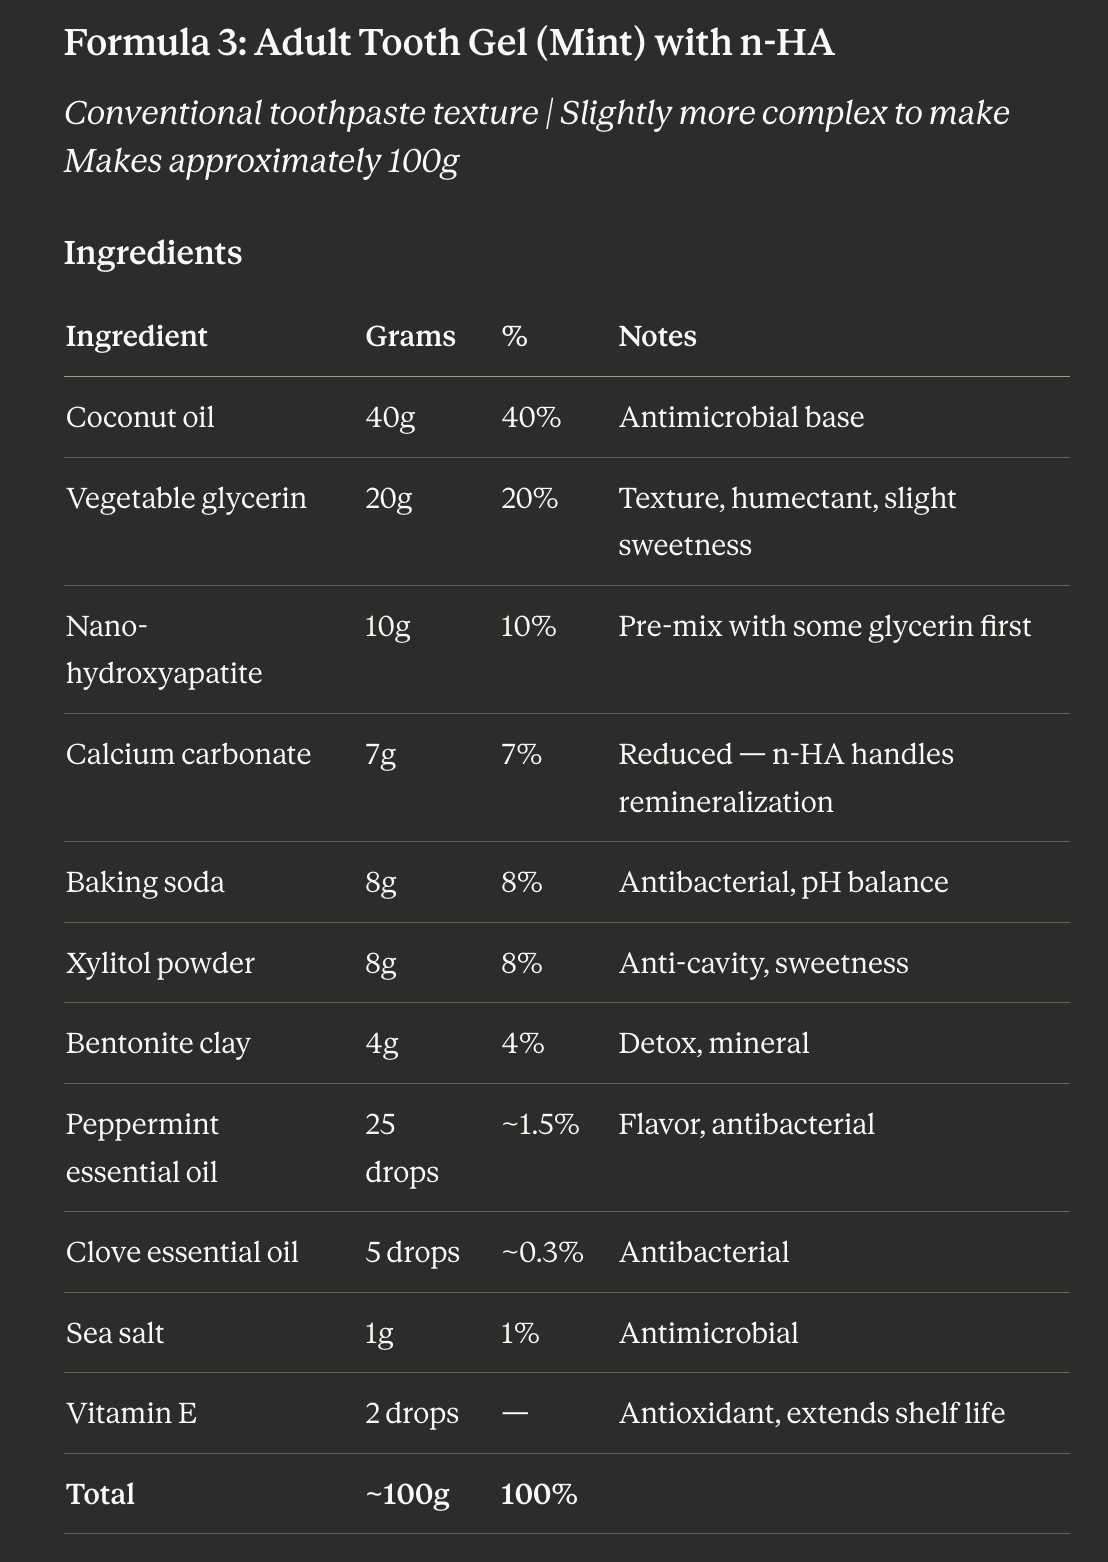
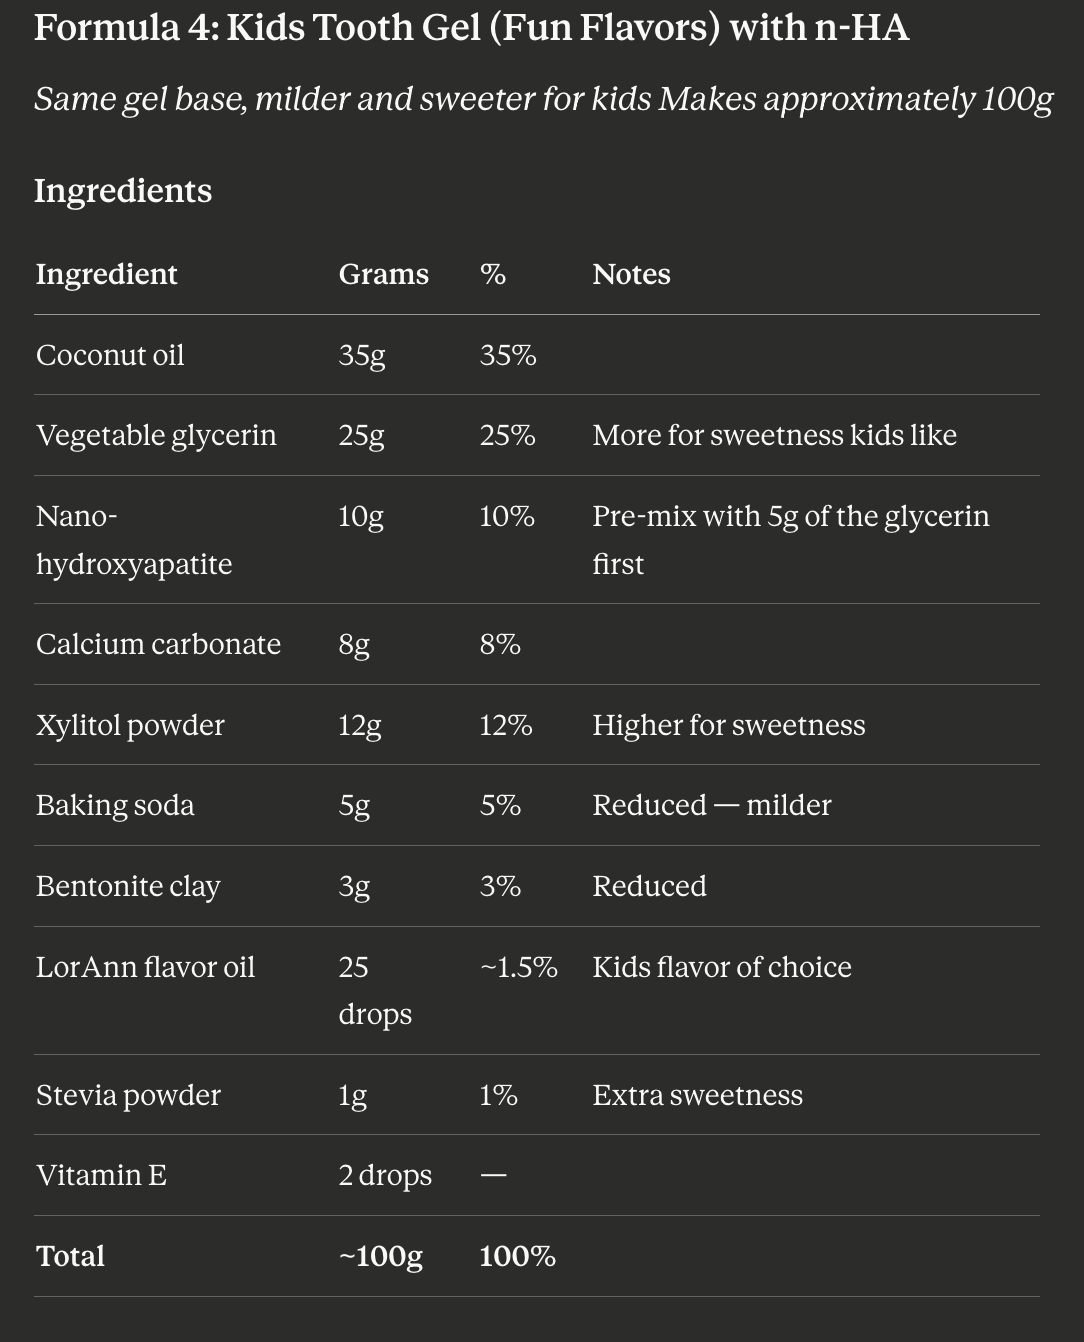
Formulas 3&4: Tooth Gel (Mint) with n-HA
Conventional toothpaste texture | Slightly more complex to make Makes approximately 100g
Instructions
Step 1 — Pre-mix n-HA Measure vegetable glycerin into a small bowl. Reserve 5g of it for this step. Add nano-hydroxyapatite to the 5g glycerin and stir vigorously into a smooth lump-free paste. Set aside.
Step 2 — Melt coconut oil If solid, gently warm coconut oil until just melted — do not overheat. Remove from heat and allow to cool to room temperature but remain liquid.
Step 3 — Combine glycerin and oil Stir remaining 15g vegetable glycerin into cooled liquid coconut oil until combined.
Step 4 — Add n-HA paste Add the pre-mixed n-HA glycerin paste to the oil-glycerin mixture. Stir or use hand frother until fully incorporated with no lumps. Take 2–3 minutes here — this step determines final texture quality.
Step 5 — Add dry ingredients Add calcium carbonate, baking soda, xylitol, bentonite clay, and sea salt one at a time, stirring thoroughly between each. Use hand frother for smoothest result.
Step 6 — Add essential oils and vitamin E Add peppermint, clove, and vitamin E. Stir thoroughly until fully distributed.
Step 7 — Texture check Consistency should be a thick smooth paste — similar to natural peanut butter. If too thick add a few more drops of glycerin. If too thin add a small amount of calcium carbonate.
Step 8 — Bottle Transfer to a small glass jar or silicone squeeze tube. Do not use metal — baking soda reacts with metal over time.
How to Use: Scoop a pea-sized amount onto toothbrush. Brush 2 minutes. Spit. Allow to sit briefly without rinsing if possible — lets n-HA continue remineralizing.
Important: Keep water out of the jar — no wet spoon or toothbrush dipped in.
Shelf life: 2–3 months room temperature | 4–6 months refrigerated
Notes:
The kids version follows the same instructions as adult gel. Pre-mix n-HA with 5g of measured glycerin into smooth paste before starting. No clove essential oil for kids — too strong. Add organic essential oil at the same step as essential oils in adult version.
Flavor tip: Make one batch per flavor in small labeled jars. Let kids personalize their jar.
n-HA Incorporation — Critical Step Summary
This applies to ALL four formulas and is the most important technique:
Always measure out a small portion of your liquid (glycerin or coconut oil)
Add n-HA powder to that liquid
Stir vigorously until completely smooth — no white clumps visible
Only then add to your main batch
Mix again thoroughly after adding
Skipping this step results in gritty texture and uneven distribution. Take your time here.
Tips
Why gel is trickier than powder:
Powder is just mixing dry ingredients — no chemistry happening, no temperature sensitivity, nothing can go wrong except clumping. Gel involves combining oil and water-adjacent ingredients (glycerin behaves somewhat like water in terms of polarity) plus getting powders to suspend evenly in a fat base. It's not difficult but there are a few specific failure points worth understanding.
The core challenge — coconut oil behavior:
Coconut oil melts at 76°F and solidifies below that. This means:
Too hot when you add powders — they can scorch or behave differently
Too cold when you try to mix — it solidifies mid-process and you get a lumpy uneven texture
Temperature in your Danville kitchen matters — summer versus winter your coconut oil will be in very different states before you even start
Temperature guidelines and why:
Melt coconut oil gently — just until liquid No thermometer needed here, just watch it. You want it fully melted but not hot. If it's too hot to comfortably touch the bowl it's too hot. Remove from heat and let it cool until just warm — around 76–85°F ideally before adding glycerin.
Why: Adding glycerin to very hot coconut oil causes it to stay liquid too long and the mixture won't emulsify properly. Adding it too cold means it seizes up before everything incorporates.
Add glycerin at room temperature or slightly warm Stir slowly and steadily. The mixture will look slightly cloudy or separated at first — keep stirring, it comes together within 30–60 seconds.
Why: Glycerin and coconut oil have different polarities — glycerin is polar, coconut oil is non-polar. They don't naturally want to combine. Slow steady stirring at the right temperature is what forces them into a workable emulsion. This is not a true emulsion like a lotion — it will separate over time if disturbed, which is why you stir before each use.
Add n-HA paste before dry powders Always add your pre-mixed n-HA glycerin paste to the oil-glycerin base before adding dry powders.
Why: The glycerin in the paste helps the n-HA particles distribute evenly throughout the oil base. If you add dry n-HA directly it clumps immediately and you'll never get it smooth.
Add dry powders at room temperature — not warm Let your oil-glycerin-n-HA mixture cool completely to room temperature before adding calcium carbonate, baking soda, xylitol, bentonite clay.
Why: This is the most important tip. If the base is still warm when you add powders — especially baking soda — you can get a slight reaction that changes the texture and consistency. Room temperature base means the powders incorporate smoothly and predictably.
Add powders one at a time — not all at once Stir each fully incorporated before adding the next.
Why: Each powder has a different particle size and density. Adding them gradually gives each one time to fully suspend before the next one changes the viscosity. Dump them all in at once and you get pockets of unmixed powder and an uneven final texture.
Use a hand frother for the powder incorporation step This is genuinely the single most helpful tool for gel toothpaste. A small milk frother or immersion blender on lowest setting gets powders suspended far more evenly than a spoon can.
Why: The mechanical action breaks up micro-clumps that form when powder hits oil — these clumps are invisible to the eye but create grittiness in the final product. The frother eliminates them.
Add essential oils or CO2 extracts absolutely last After everything is fully incorporated and at room temperature.
Why: Essential oils can react with baking soda if added too early or when warm, potentially causing a slight fizzing or texture change. At room temperature into a fully mixed base they incorporate without issue.
The texture progression to expect:
As you add each powder your base will go from:
Clear oily liquid (just coconut oil)
Slightly cloudy (glycerin added)
Pale creamy (n-HA paste added)
Thickening (first powder added)
Paste-like (more powders)
Thick smooth paste (all powders incorporated)
If at any point it looks too thick — add a few drops of glycerin. Too thin — add a small amount of calcium carbonate. These are your two adjustment levers throughout the process.
Storing and using the gel:
The finished gel will firm up significantly overnight especially if your kitchen is cool. This is normal — coconut oil solidifying as temperature drops. It does not mean something went wrong. Just scoop from the jar with a clean dry spoon. Never dip a wet toothbrush directly in — introduce a drop of water and you introduce potential contamination that shortens shelf life.
In summer your gel may be softer or almost liquid in texture — still works perfectly, just messier to apply. Keep it in the fridge June through September in Danville to maintain a workable consistency.
One practical tip before making a full batch:
Make a half batch of the gel base only — just coconut oil, glycerin, and n-HA paste — and practice the mixing technique before committing all your powders. Takes five minutes and teaches you exactly how the base behaves in your specific kitchen at your current temperature. Then add to it to complete the full formula once you're comfortable with the base consistency.
That single practice run eliminates most of the uncertainty on your first real batch.