You have two options here, go the hair detox route and use the same soap bar for everything: body soap, shampoo and conditioner. You just have to consider adding in an apple cider vinegar rinse to compensate for pH balance.
Or you can make the more traditional shampoo/conditioner bar, but have to go the more unnatural route.


Detox Tallow Soap: Requires a 4–6 week cure time. Store cut bars on a well-ventilated rack in a cool, dry place, ensuring air can circulate all around them. Label the rack with the Date Made and Ready Date.
Syndet Bars (Shampoo/Conditioner): Require 1–2 days of drying time after molding. They do not undergo a lye cure. Once hard, they should be stored in an airtight container away from humidity until needed.
🧼 My preferred: The Hair Detox Option
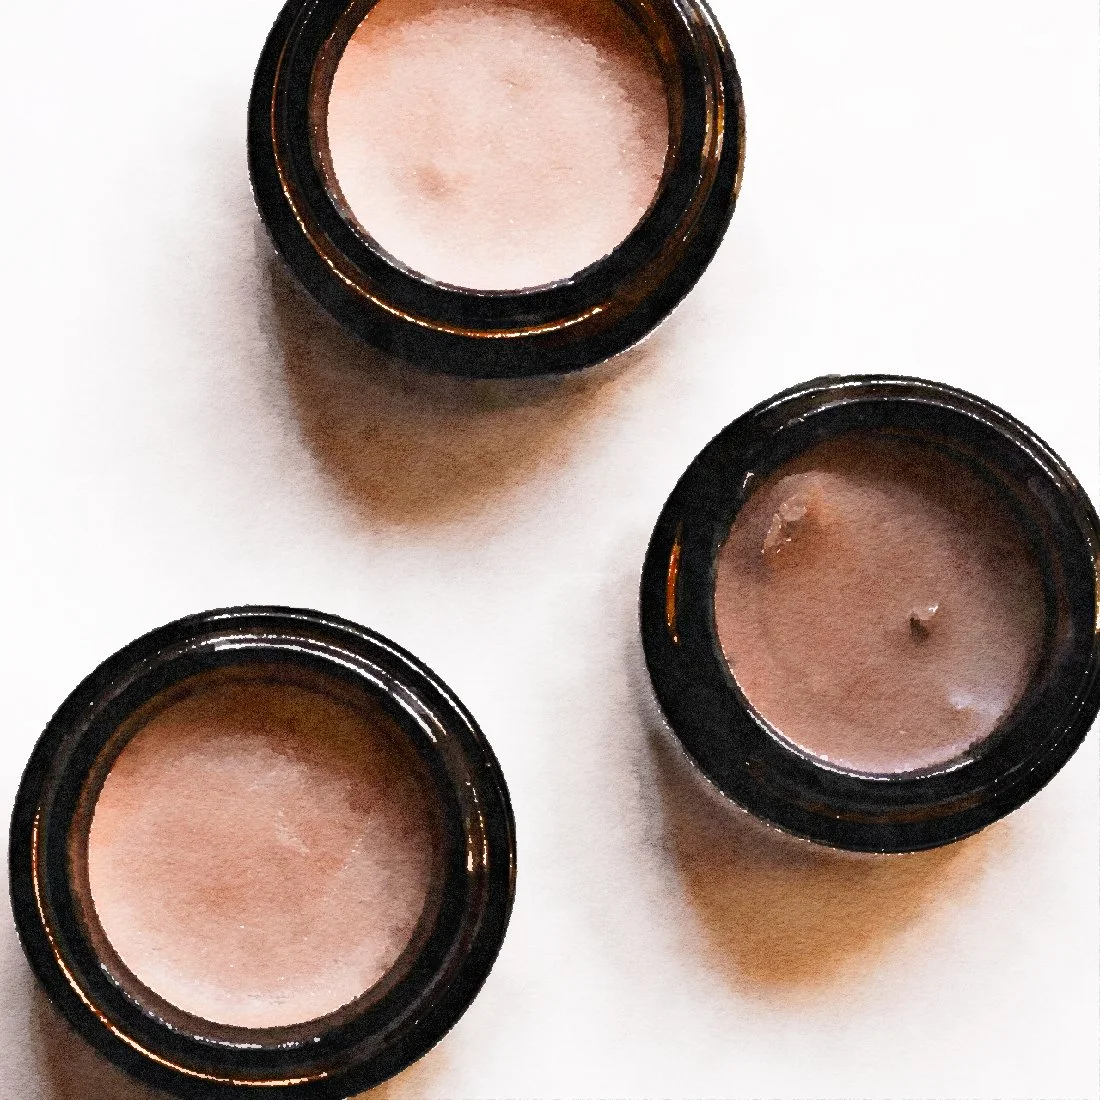
My current soap bar works great as it is for a "detox" and "body/shampoo/conditioner-in-one" option. This is exactly what the natural/no-poo community uses: a true, saponified soap bar with high-quality oils.
Why It Works for the Detox Route:
True Soap: This bar is a genuine soap (saponified oils and lye), not a synthetic detergent (syndet). It contains zero sulfates, silicones, parabens, or hidden fragrances—perfect for the detox philosophy.
High Tallow Content: The high 45% tallow content is fantastic. Tallow provides a gentle, conditioning clean that is superior to many vegetable-only soaps for hair.
Conditioner Action: The $5\%$ superfat (unsaponified oils) is what serves as the "conditioner" in this bar. These leftover oils coat and nourish the hair after the cleansing action of the soap.
The Catch (and Solution): The primary hurdle with any true soap bar used as shampoo is the pH level (around 8–10). This high pH can cause the hair's cuticle to lift, resulting in a waxy or sticky feeling, especially in hard water areas.
Solution: For the detox route, you must advise users to follow the wash with an Acid Rinse (e.g., Apple Cider Vinegar or diluted lemon juice) to neutralize the pH and smooth the cuticle. This is a non-negotiable step for the best results.
🍎 The Simple, Essential ACV Rinse (Your Post-Wash Step)
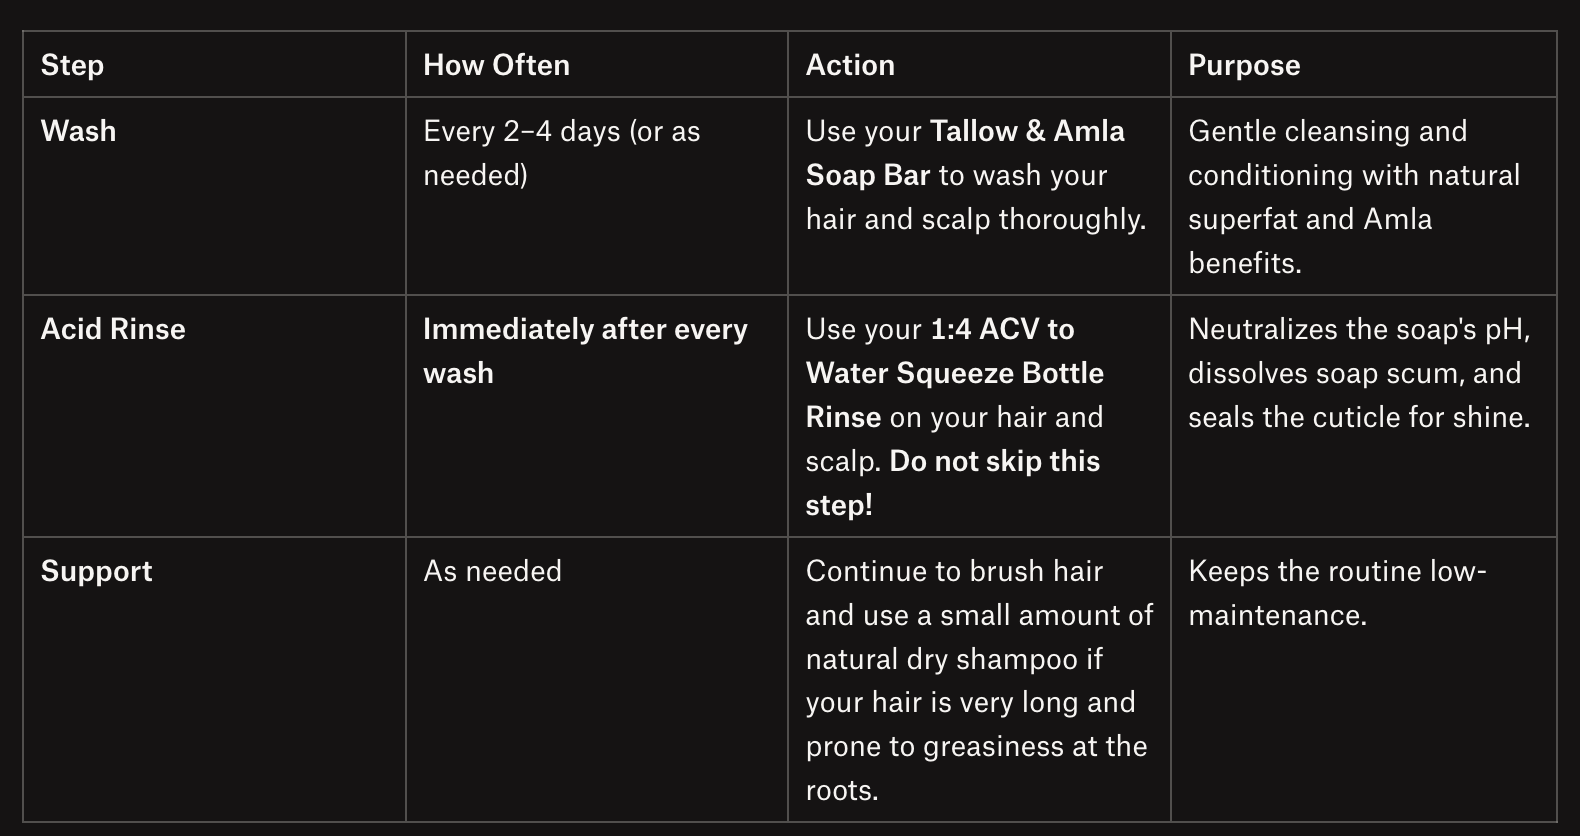
This is the quick, low-effort step required every time you use your tallow soap bar to neutralize the pH and remove soap scum.
The Basic Recipe:
The Process:
Preparation: Mix the ACV and water in a clean plastic squeeze bottle (like a repurposed condiment bottle or an empty shampoo bottle).
Wash: Shampoo your hair with your tallow soap bar, scrub well, and rinse thoroughly with water.
Rinse: Tilt your head back and slowly pour the ACV solution over your entire scalp and hair. You can massage it in for 30 seconds.
Final Rinse (Optional): You can rinse it out right away, or leave it in. Many people with long hair or hard water do a very quick final water rinse, but the vinegar scent disappears completely as the hair dries.
Goal: This simple, diluted rinse is a chemical necessity, but it takes less than 60 seconds to perform and leaves your hair smooth and shiny.
That is the beauty of the acidic rinse—it can be as simple or as complex as you want!
The recipe you saw using bentonite clay, aloe, and ACV is actually an intensive detoxifying hair mask, not the simple everyday rinse you need to follow your tallow soap bar.1
Here is the breakdown of the two distinct uses and how simple the essential rinse is.
🍎 The Simple, Essential ACV Rinse (Your Post-Wash Step)
This is the quick, low-effort step required every time you use your tallow soap bar to neutralize the pH and remove soap scum.
The Basic Recipe:
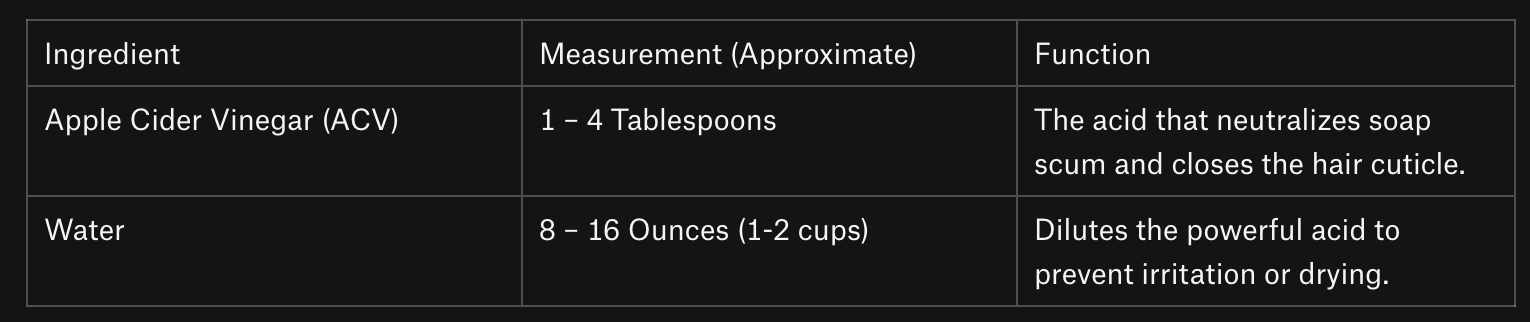
IngredientMeasurement (Approximate)FunctionApple Cider Vinegar (ACV)1 – 4 TablespoonsThe acid that neutralizes soap scum and closes the hair cuticle.Water8 – 16 Ounces (1-2 cups)Dilutes the powerful acid to prevent irritation or drying.
How Simple is the Process?
Preparation: Mix the ACV and water in a clean plastic squeeze bottle (like a repurposed condiment bottle or an empty shampoo bottle).2
Wash: Shampoo your hair with your tallow soap bar, scrub well, and rinse thoroughly with water.3
Rinse: Tilt your head back and slowly pour the ACV solution over your entire scalp and hair.4 You can massage it in for 30 seconds.
Final Rinse (Optional): You can rinse it out right away, or leave it in.5 Many people with long hair or hard water do a very quick final water rinse, but the vinegar scent disappears completely as the hair dries.
Goal: This simple, diluted rinse is a chemical necessity, but it takes less than 60 seconds to perform and leaves your hair smooth and shiny.
🌿 The ACV/Clay Mask (The Intensive Detox)
This recipe with Bentonite Clay and Aloe is a full-fledged Hair Detox Mask. It is not meant for daily use.
Purpose of the Mask:
Bentonite Clay: This ingredient (which carries a negative charge) acts like a magnet, pulling out years of accumulated positive-charge residue from synthetic products (like silicones and sulfates).
Aloe Vera: Added to moisturize and prevent the clay from drying out the hair.6
ACV (Acid): Added to the mask mixture to activate the clay and help it bond with impurities.
The Process
Requires careful mixing in a non-metal bowl with a non-metal spoon (metal can deactivate the clay's drawing properties).
Applying the thick, muddy paste evenly from scalp to ends takes time and can be messy.
The mask must sit on your hair for 20-30 minutes, usually covered by a shower cap, and must not be allowed to fully dry.
Rinsing the clay completely out of your hair requires a lot of time and water.
Goal: This is an intensive treatment you would use once a month or during the initial 2-4 week detox transition period to accelerate the removal of old buildup before settling into your routine with the tallow soap and simple ACV rinse.
The good news is that for your regular, pure-tallow routine, the rinse is a quick 1-part ACV to 4-8 parts water solution that you just pour over your head!
Making the ACV rinse convenient is key to making the simple tallow soap bar a successful, long-term routine.
1. The Right Container is Crucial
The goal is a container that allows for slow, controlled application, is durable, and won't shatter if dropped.
Best Option: The Squeeze/Condiment Bottle
Why it works: These are perfect! They are plastic, unbreakable, and the small nozzle allows you to aim the rinse directly at your scalp and hair, ensuring even coverage without wasting the solution.
2. Prepare in Batches, like a week at a time.
Use a larger, secondary container (like an empty milk jug or large Mason jar kept outside the shower) to mix a large batch of your preferred ratio (e.g., 2 tablespoons ACV per 1 cup of water, scaled up to fill your container).
Refill from the large batch once a week or so, as needed
3. Label Clearly and Keep it Handy
Labeling: Clearly label your shower bottle as "ACV Rinse" to avoid confusion. You may want to note the ratio on the label as a reminder (e.g., "1:4 ACV Rinse").
4. Adjust the Strength for Your Hair
While the basic 1:4 to 1:8 ratio is standard, you can adjust it based on results:
If your hair still feels waxy or heavy: Increase the ACV slightly (more acid to dissolve more soap scum).
If your hair feels dry or brittle: Decrease the ACV slightly (your hair might be sensitive to too much acid).
For me, as someone with very long hair, that gets oily quickly, I want a stronger, more concentrated rinse to break down any soap scum and excess oil. So I started with a 1 part ACV to 4 parts Water ratio.
Since you have long hair, you will likely use about $1$ cup (8 fluid ounces) of the solution per wash to ensure full saturation. If you wash your hair 3-4 times per week (which is common for managing quick-onset oiliness), a good weekly bottle size would be about 32 fluid ounces.
Recommended Weekly Squeeze Bottle: 32 fl oz (Approx. 950 mL)
Rationale: This size allows for 4 washes at 8 oz per wash. You would fill this bottle once per week.
2. Monthly Batch Size
Assuming a 4-week month, your monthly consumption would be 4 times the weekly amount (4 x 32 oz). We can round this up slightly to a common container size for easy storage.
Recommended Monthly Batch Size: 144 fl oz (Approx. 4.25 Liters)
Container Suggestion: This size fits perfectly into a standard 1-gallon jug or container (1 gallon is 128 fl oz, so a little over a gallon gives you plenty).
Preparation Day (Monthly): In a designated clean, large pitcher or plastic jug (at least 1 gallon size), combine the 3.5 cups of ACV and the 14.5 cups of water. Label this "Monthly ACV Rinse."
Weekly Refill: Once a week (or as needed), fill your 32 fl oz squeeze bottle from the monthly supply. This bottle goes into the shower.
Wash Day: Use your tallow bar, rinse, then slowly apply $8 \text{ fl oz}$ of the solution from the squeeze bottle over your head and hair.
Application for Long, Oily Hair:
Focus on the Scalp: Since your oiliness starts at the roots, apply the rinse primarily to your scalp first, massaging it in thoroughly. This is where most of the soap scum and excess sebum will accumulate.
Work the Length: Slowly pour the remaining rinse down the length of your hair, gently squeezing it through the strands.
Soak Time: Allow the rinse to sit for one to two minutes before rinsing (optional). This gives the acid time to work on the long strands.
Consistency: Use this rinse every single time you use the tallow soap bar.
Adjusting Your Ratio:
If your hair feels too clean or dry/brittle: Decrease the ACV to a $1:5$ or $1:6$ ratio.
If your hair still feels waxy or heavy after drying: Increase the ACV to a $1:3$ ratio.
Do You Need a Separate Conditioner?
No, you should not need a separate conditioner (especially during the detox phase).
You are correct: the tallow soap is the cleanser AND the conditioner.
How the Tallow Bar Conditions:
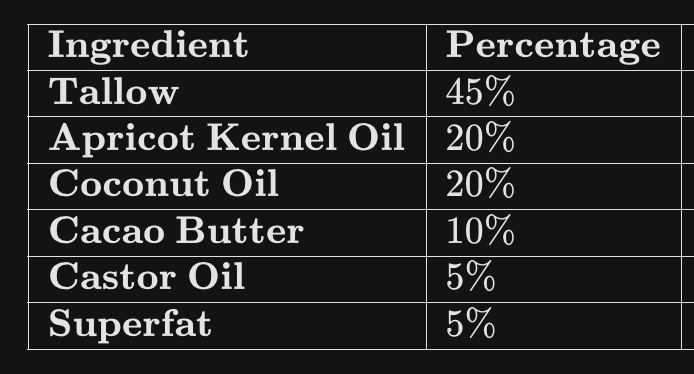
Superfat (The Built-in Conditioner): Your recipe has a $5\%$ superfat. This means $5\%$ of your oils (tallow, apricot kernel, cacao butter, etc.) are left unsaponified (unturned into soap). These are the rich, nourishing oils that deposit onto your hair as you wash, acting as a natural, low-chemical leave-in conditioner.
Sebum-Like Composition: Tallow, in particular, is an excellent "conditioner" because its fatty acid profile is very close to human sebum (your natural protective oils).1 It nourishes the hair shaft without leaving the heavy, suffocating buildup that non-water-soluble silicones do.
The ACV Rinse Completes the Conditioning: The final conditioning effect comes from the ACV rinse sealing the cuticle. The combination of the conditioning oils left by the superfat plus the smooth, sealed hair shaft from the acid rinse results in soft, manageable hair without the need for a synthetic conditioner bar.
When a Conditioner Might Be Used:
If you find that your long hair is particularly dry or tangly after using the tallow soap and the ACV rinse, you might consider using a tiny amount of a natural leave-in oil (like a drop of argan or jojoba oil) after your hair has dried, but this is usually only necessary for very dry ends.
For most users, especially during the detox and natural routine, the tallow bar $+$ the ACV rinse is the complete two-step process.


Transition and Routine Plan
1. 🗓️ Phase 1: The Hair Detox (Approx. 2–4 Weeks)
The goal of this phase is to remove years of synthetic buildup (silicones, sulfates) and signal to your scalp that it can stop overproducing oil. This is when you use the clay mask, not the simple ACV rinse.
You can start using the Tallow Soap as your shampoo/conditioner after 2–4 weeks of the detox phase, or as soon as you feel the texture of your hair has changed from synthetic-coated/heavy to simply oily/waxy.
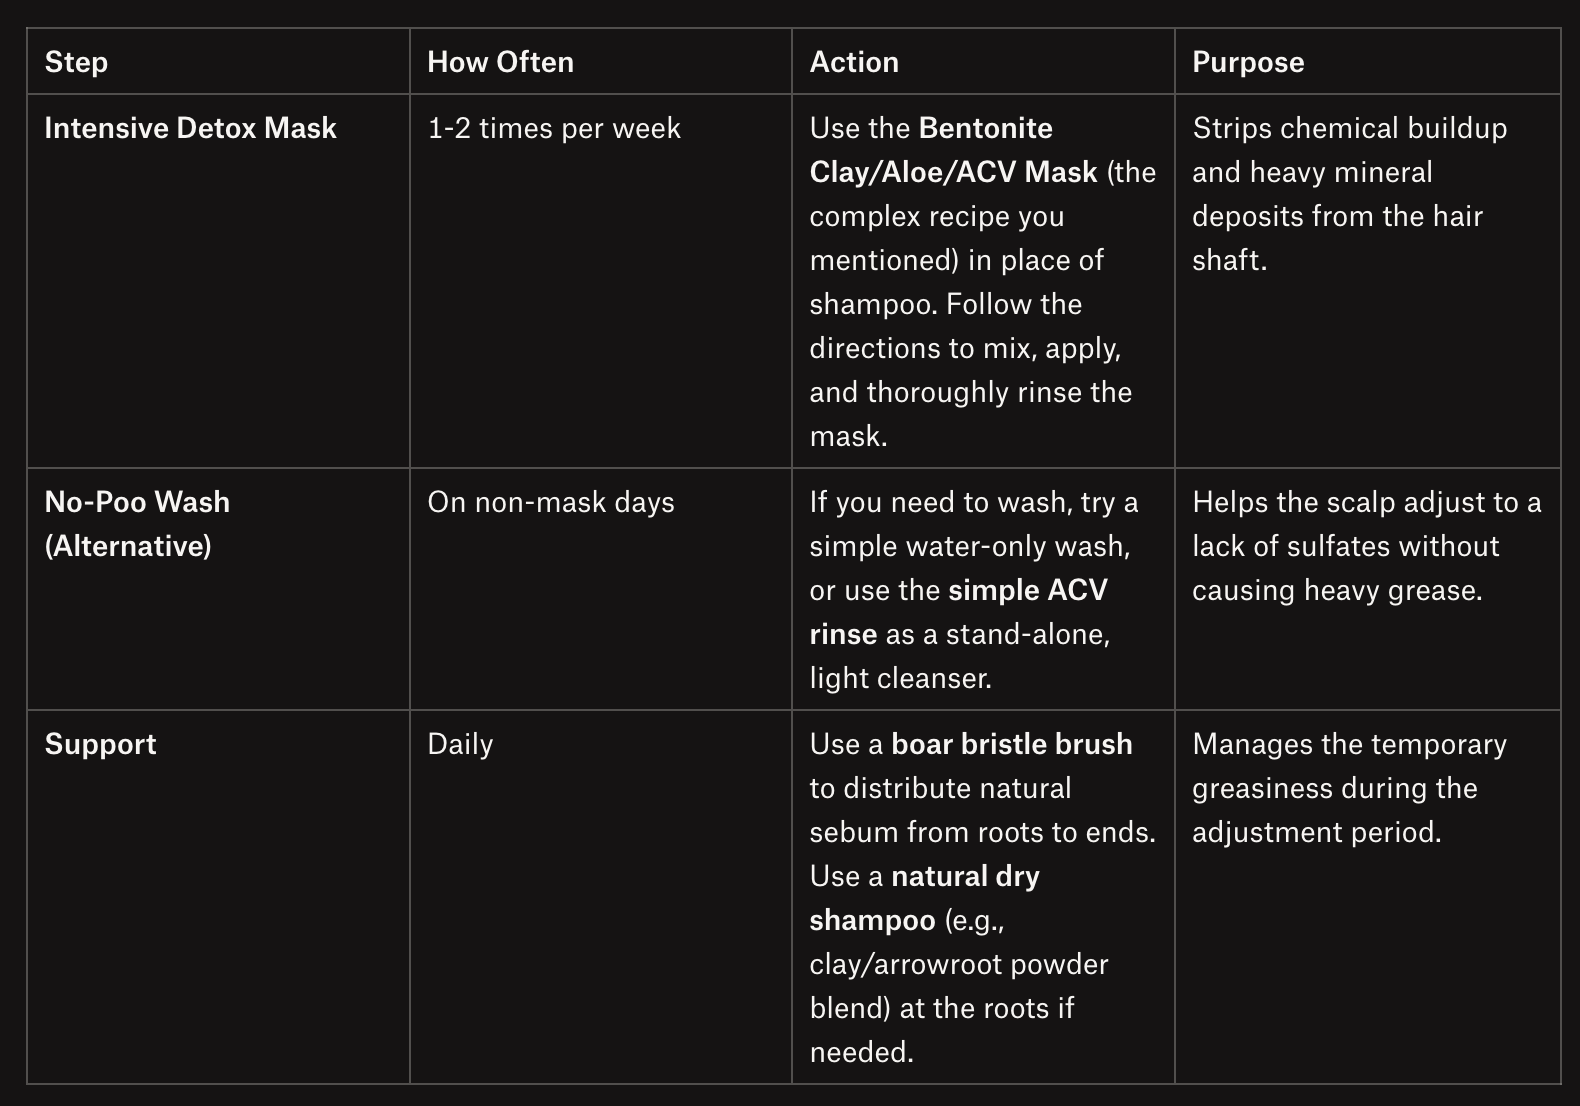
2. 🧼 Phase 2: The Maintenance Routine (Ongoing)
Once you begin using the tallow soap, you stop the intensive clay masks and settle into your two-step, low-chemical routine.
Does It Take Weeks to See Results?
Yes, patience is essential.
Initial Transition (Weeks 1-4): This is the hardest time. Your hair may feel heavy, waxy, or greasy because the old buildup is gone, and your scalp is still panicking and overproducing oil. The clay masks and the simple ACV rinse are your essential tools during this time.
Adjustment (Months 2-4): This is when your scalp's oil production begins to normalize. You'll find you can extend the time between washes, and your hair will feel genuinely soft and balanced.
The total commitment to experience the true long-term benefits is typically 2 to 4 months.
That is a fantastic, two-part question! Let's cover the recipe for your detox mask and then tackle the very important question of whether the whole journey is worth it.
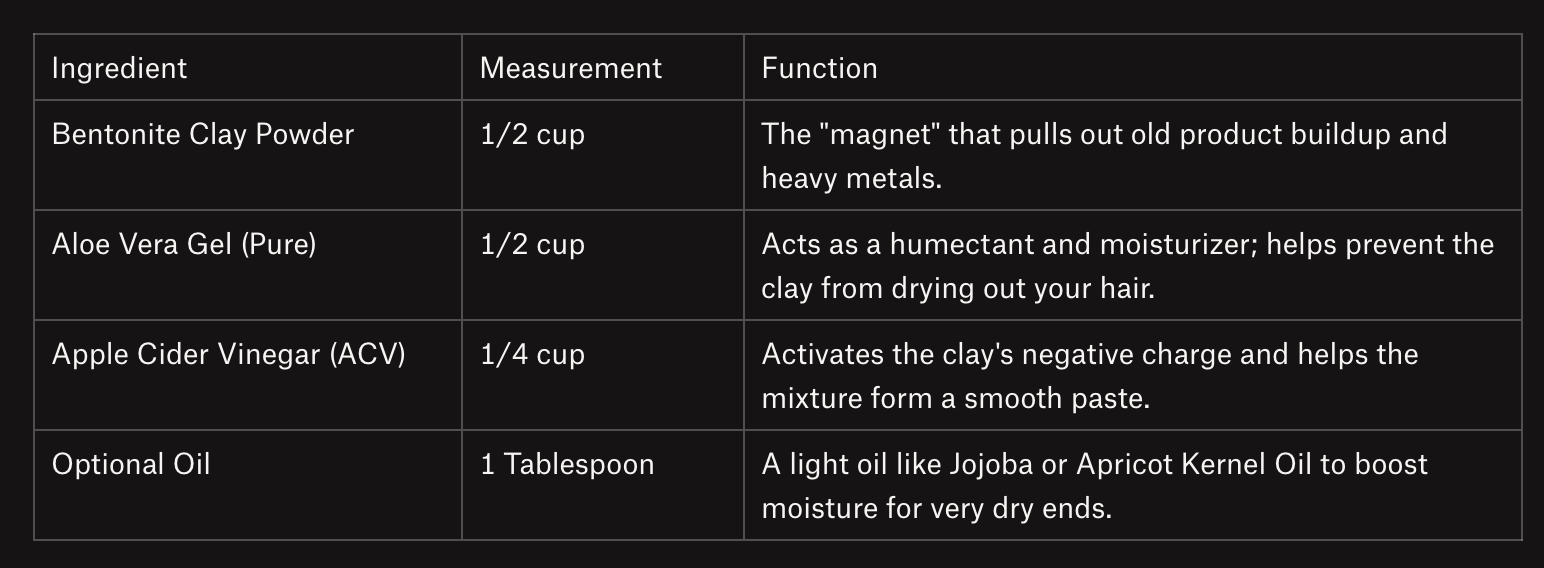
🌿 Part 1: Bentonite Clay Hair Detox Mask Recipe
This mask is your heavy hitter for Phase 1 of the detox. Remember the non-negotiable rule: Use a plastic, wooden, or glass bowl and utensil—never metal—to mix the clay, as metal can deactivate its beneficial drawing properties.1
Detox Mask Ingredients
This recipe is scaled for long hair and can be divided or adjusted based on your hair density.
IngredientMeasurementFunctionBentonite Clay Powder$\frac{1}{2} \text{ cup}$The "magnet" that pulls out old product buildup and heavy metals.Aloe Vera Gel (Pure)$\frac{1}{2} \text{ cup}$Acts as a humectant and moisturizer; helps prevent the clay from drying out your hair.Apple Cider Vinegar (ACV)$\frac{1}{4} \text{ cup}$Activates the clay's negative charge and helps the mixture form a smooth paste.Optional Oil$1 \text{ Tablespoon}$A light oil like Jojoba or Apricot Kernel Oil to boost moisture for very dry ends.
Instructions for Use
Mix: Combine the clay, aloe vera gel, and ACV in your non-metal bowl.2 Whisk until a thick, smooth, mud-like paste is formed. Add a tiny splash of water if it is too thick to spread.
Apply: Section your hair and apply the mask generously from the scalp down to the ends (like you are applying a hair dye).3
Wait & Cover: Cover your hair with a plastic shower cap or plastic wrap. The mixture must remain moist. Let it sit for 20–30 minutes. Do not allow the clay to fully dry out, as this can become difficult to rinse and can dry the hair.
Rinse: This is the most important step! Rinse your hair extremely well with lukewarm water, massaging your scalp gently until all traces of clay are gone. This takes time, so be patient.
Follow-up (Optional): Some users follow this intense mask with a simple $\frac{1}{4} \text{ cup}$ of diluted ACV rinse to ensure the final pH balance, especially if you added no oils to the mixture.
Is It Worth It?
The simple answer, supported by the dedicated community of "converts" and the science of what you are removing, is Yes, it is worth the effort, but only if you commit to the full transition.
Benefits (What you gain)
Health Autonomy: Eliminating hormone disruptors (Parabens, Phthalates) and potential irritants (SLS/SLES) from your routine.
Balanced Hair/Scalp: Scalp rebalances oil production, leading to less frequent washing (a huge time saver long-term).
Natural Texture & Volume: Removing synthetic coatings (silicones) allows your hair's natural wave, volume, and texture to return.
Sustainable & Cost-Effective: Tallow bars last longer, and the ingredients are simple and less expensive over time than buying multiple synthetic products.
For someone whose philosophy centers on "least chemicals possible," and who is willing to commit to the ritual (the ACV rinse), the payoff is enormous. You are trading a small amount of short-term discomfort for a long-term, self-sufficient, and chemically clean hair care routine.
You are not just changing shampoo; you are changing a fundamental dependency cycle.
What about kids? Do they need to detox?
The primary reason adults need a 2–4 month detox is to strip away years of accumulated synthetic residue, specifically non-water-soluble silicones and waxes from styling products and conditioners.
Children usually have less buildup. If a child has only used basic, conventional shampoo and minimal to no styling products, the amount of residue to strip away is much lower. Their hair is often in a more "natural" state.
The Scalp Rebalance is Shorter. Their sebaceous glands have been exposed to harsh sulfates for a shorter time, so the overproduction response is usually much quicker to normalize.
Use a very diluted ACV rinse (start with 1 part ACV to 8 parts water) as a gentle clarifying treatment for their hair 1–2 times before the first tallow bar use. This will wash away any surface buildup.
This more diluted solution is important due to a child’s more sensitive skin.
Just like adults, they must follow the tallow soap wash with the diluted ACV rinse to neutralize the pH and prevent soap scum.
The adjustment period for a child is typically 2–4 weeks—much shorter than the adult timeline. If their hair feels clean and soft with the ACV rinse, no further detox is needed.
If they have a few weeks of slightly greasier hair, reassure them (and yourself!) that this is the scalp learning to balance itself. Since they are avoiding endocrine disruptors, this short adjustment is well worth the long-term health benefit.
🔬 Mainstream Shampoo Bar: The Syndet Route
To create a bar that functions like a conventional shampoo (cleans well, lathers abundantly, rinses clean without an acid rinse), you need to make a Synthetic Detergent Bar (Syndet Bar). This bar is generally lye-free and relies on high-performance surfactants.
This is the only way to meet the expectations of someone not on a detox journey. As someone already wary of traditional chemicals, the goal is to use the gentlest possible, but effective, surfactants and conditioning agents.
Essential Ingredients to Include (Your Mainstream Option)
You will likely need to use a blend of ingredients that you might not keep in your home, but they are the industry standard for lye-free shampoo bars.
Making your own tallow shampoo and conditioner bars involves two different processes. The shampoo bar is made using the cold-process soap method with lye, while the conditioner bar is a gentler, melt-and-pour process using specific conditioning agents.
Part 1: Tallow Shampoo Bars (Cold Process Method)
This process requires careful safety precautions as it involves handling sodium hydroxide (lye). The resulting product is a genuine, long-lasting soap bar rich in moisturizing fatty acids.
⚠️ Safety First
Always wear protective gear, including safety goggles and gloves.
Work in a well-ventilated area, preferably outdoors, when mixing the lye solution.
Always add lye to water, never the other way around, to prevent a dangerous reaction.
Use heat-safe containers (stainless steel or food-grade plastic); avoid glass, which could crack.
Ingredients
Oils:
10 oz (283.5 g) grass fed beef tallow
10 oz (283.5 g) olive oil
apricot kernel oil is an excellent substitute for olive oil.
10 oz (283.5 g) coconut oil
Babassu Oil: This is the closest 1:1 substitute for coconut oil and provides very similar results in terms of bar hardness and bubbly lather. It is a hard oil at room temperature, much like coconut oil, but generally has a lighter feeling on the skin. (from palm kernals)
6 oz (170.1 g) castor oil
Lye solution: 13.7 oz (388.4 g) water, 5.1 oz (144.6 g) sodium hydroxide (lye).
Optional:
1 tbsp essential oils (e.g., lavender or rosemary) for fragrance,
a hair-strengthening powder like Amla powder (how much??)
Amla (Indian gooseberry) is great for hair products because it's packed with Vitamin C, antioxidants, and fatty acids that strengthen follicles, promote growth, prevent premature graying, and deeply moisturize, leading to less frizz, more shine, and healthier, stronger hair by fighting damage, improving circulation, and balancing scalp oil.
Instructions
Prepare the oils: In a medium saucepan, gently melt the tallow, olive oil, coconut oil, and castor oil together over low to medium-low heat. Once melted, remove from heat and allow the mixture to cool to approximately 100°F (38°C).
Mix the lye solution: Outdoors or in a very well-ventilated space, carefully pour the lye into the measured water (never water into lye). Stir gently until the lye is completely dissolved and the solution turns clear. Set aside to cool for about 10 minutes.
Combine mixtures: When both the oil mixture and lye solution are around 100°F, slowly pour the lye solution into the oils.
Blend to "trace": Use an immersion blender to mix the ingredients. Blend until the mixture reaches a consistency similar to vanilla pudding or thin custard ("trace"). Do not overmix.
Add optional ingredients: Briefly mix in any essential oils or powders.
Pour into mold: Pour the mixture into a silicone soap mold.
Cure the bars:
Let the soap set in the mold for 24 hours before unmolding and cutting into bars.
Place the cut bars on a rack with good air circulation and allow them to cure for at least 4-6 weeks before use. This process is essential for a mild, hard, and long-lasting bar.
Part 2: Tallow Conditioner Bars
Conditioner bars are an entirely different product made with emulsifiers and conditioning agents (like BTMS-50 and cetyl alcohol) rather than lye.
Ingredients
Conditioning agents:
70g BTMS-50,
40g cetyl alcohol.
Oils:
34g tallow,
30g argan oil.
Other:
10g glycerin,
1g preservative (Optiphen),
essential oil (optional).
Instructions
Melt ingredients: Gently melt the BTMS-50, cetyl alcohol, tallow, and argan oil in a double boiler until fully liquid.
Combine and add additives: Once melted, remove from heat and stir in the glycerin, preservative, and essential oils/fragrance.
Pour and set: Pour the mixture into a silicone mold. It will solidify as it cools.
Cool completely: Allow the bars to set completely before removing them from the mold. Unlike shampoo bars, these can be used immediately once solid.
Is Homemade Better than Kitsch?
From an ingredient control perspective, the homemade version is better:
Ingredient Quality Control: You know the source and quality of your tallow and apricot kernel oil.
Maximum Tallow: Your bar can feature a much higher percentage of natural conditioners like Tallow and Apricot Kernel oil without relying on excessive synthetic conditioners.
Customization: You can adjust the oil type or fragrance to his specific liking, which you cannot do with a pre-made bar.
This formula provides the performance your husband is accustomed to (lather, cleanliness) with the natural, superior conditioning power of tallow that aligns with your philosophy.


two bars per 150g batch
Bar Diameter: 2 inches (matches most molds)
Target Bar Height: 1.5 inches (approx.)The height holds about 90g soap each
Aiming for 10 bars of each type:
Detox Tallow Soap: We'll use your original 32 oz (907g) recipe for a 10-bar batch (which is already a great size for a standard loaf mold).
Husband's Shampoo Bar: 10 bars times 89g/bar} = 890g total batch.
Husband's Conditioner Bar: 10 bars times 89g/bar} = 890g total batch.
🛠️ Part 1: Hot Press/Pour Method for Syndet Bars
This method is necessary because you are combining melted oils and solid powders (surfactants). Safety is still important, especially when dealing with fine powders like SCI.
⚠️ Safety First for Syndet Bars
Wear a Mask: Always wear a dust mask or a tight-fitting surgical mask when measuring and handling the SCI powder. It is an irritant to the lungs and throat.
Ventilation: Work in a well-ventilated area.
🧼 Shampoo Bar (Press Method) Instructions
Prepare Powders & Solids (Phase A):
Measure the SCI, Cetyl Alcohol, Tallow, Apricot Kernel Oil, and Amla Powder into a heat-safe glass or stainless steel bowl set over a double boiler (or in a pot with a few inches of water).
Melt & Blend:
Heat gently until the Tallow and Cetyl Alcohol are completely melted. The SCI will not melt entirely, but it should become incorporated into the molten fats, creating a thick, gritty paste. Stir constantly.
Remove from Heat:
Once melted, remove the bowl from the heat.
Add Wet & Conditioning Agents (Phase B):
While the mixture is cooling but still warm and pliable, add the CAPB, Water/Binder, Panthenol, Preservative, and Essential Oil.
Knead to Dough:
Stir the mixture vigorously. As it cools, it will thicken into a dough-like consistency, similar to firm bread dough. You may need to use a gloved hand to knead it briefly to ensure everything is fully combined.
Press:
Immediately press the warm dough firmly into your silicone molds. Pack it down tightly to eliminate air pockets.
Set:
Place the molds in the freezer or refrigerator for 30 minutes. Once hard, unmold the bars and let them sit at room temperature for 1–2 days to completely dry and harden before use.
🧴 Conditioner Bar (Pour Method) Instructions
Melt Solids:
Measure the BTMS-50, Cetyl Alcohol, Tallow, Apricot Kernel Oil, and Cacao Butter into a heat-safe bowl over a double boiler.
Heat until everything is completely melted and the mixture is a clear, homogenous liquid.
Cool & Add Additives:
Remove the bowl from the heat and allow the mixture to cool for a minute or two.
Add the Panthenol, Preservative, and Essential Oil. Stir gently until fully incorporated.
Pour:
Immediately pour the liquid mixture into your silicone molds.
Set:
Transfer the molds to the refrigerator or freezer. The bar will harden completely when cool and can be used immediately once solid.
🔬 Part 2: Choosing a Preservative
Because you are adding a significant amount of water/liquid binder to the Shampoo Bar, and there is moisture risk in the Conditioner Bar, a preservative is absolutely essential for safety against mold, yeast, and bacteria. Without one, the bars could spoil within a week.
Since you prefer the "least chemicals possible," you should choose a broad-spectrum preservative that is highly effective at low use rates and is approved by clean beauty standards.
Recommended Preservatives
The best choices for your goal are:
Liquid Germall Plus (LGP):
Pros: Highly effective, works over a broad pH range, and only requires a very low use rate of 0.1% to 0.5% (which is what we used in the sample formula). It's easy to source.
Cons: It's a synthetic preservative.
Optiphen Plus:
Pros: Highly regarded in natural formulation; formaldehyde-free and paraben-free.
Cons: It requires a slightly higher use rate (up to 1.5) and works best in a specific pH range (below 6), which you should be able to meet with these bars.
Geogard 221 (Benzyl Alcohol & Dehydroacetic Acid):
Pros: Certified for use in natural and organic cosmetics, highly effective.
Cons: It requires slightly more effort to source and integrate correctly.
Recommendation: For a beginner syndet maker, Liquid Germall Plus is the easiest to measure and integrate effectively at the low use rate of 0.5%, giving you the best chance of success and safety.
That's an excellent follow-up question. Sourcing these specialized ingredients is the final hurdle, and you want to make sure you get quality, authentic products, especially when dealing with surfactants and preservatives.
Is Amazon Okay?
I strongly advise against buying specialty cosmetic chemicals (like SCI, BTMS-50, and Liquid Germall Plus) from Amazon.
Better Suppliers:
Bramble Berry
Wholesale Supplies Plus
MakingCosmetics
Lotion Crafter
Export to Sheets
You can often find all the necessary ingredients for both your Tallow soap bar and your Syndet bars (including the Amla powder and carrier oils) at any one of these specialized online stores.