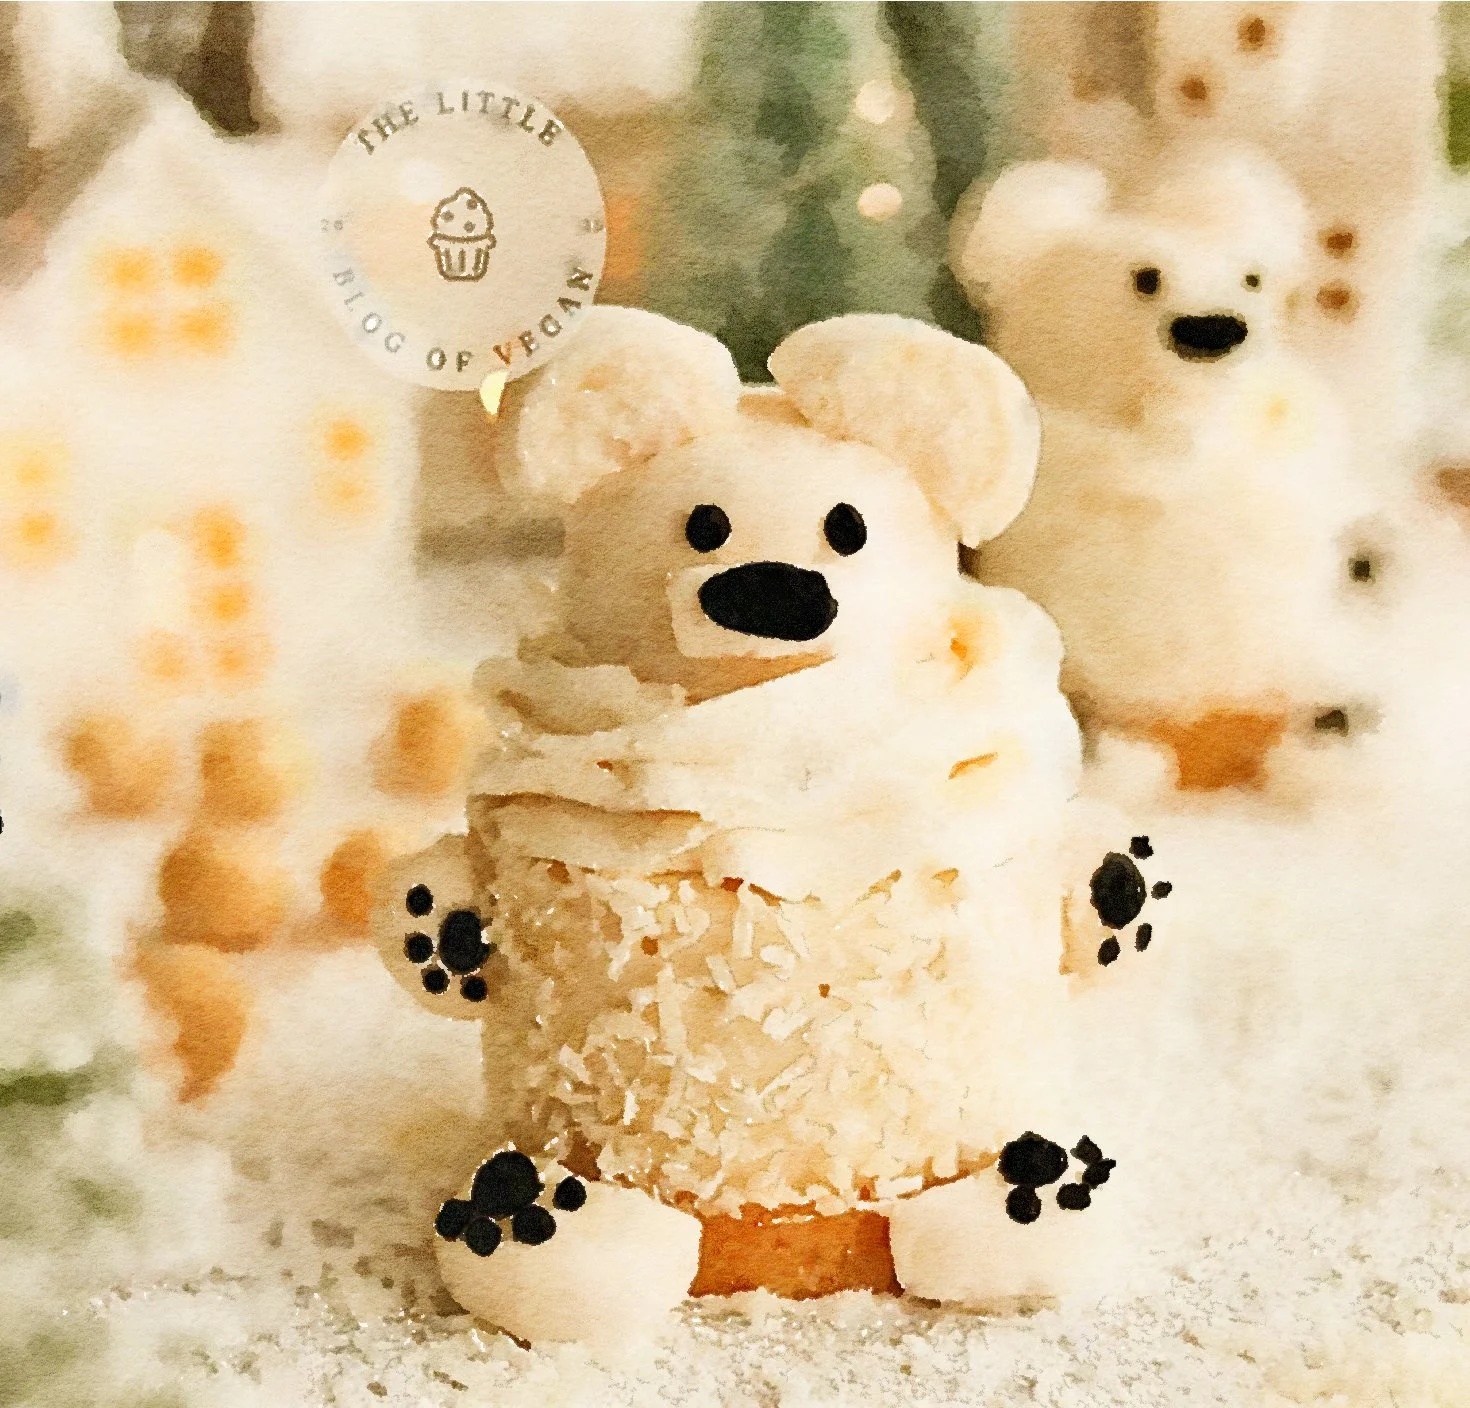
3-Ingredient Vanilla Cheesecake
Inspired by the absolute cutest cake I have ever seen in my life.
Of course, true to form, my version was the meme version of the less-than copycat found online at “The Little Blog of Heaven”, but the cake itself was beautiful and oh-so-delicious!
When I tried adding in the little ears and face, I ended up with more piglets than bears. But the cake itself was so good that it was absolutely worth saving!
Here are my notes. For the bear, I had even made my own marshmallows, but that is unceccessary for just the cheesecake part.
Necessary tool: the Mini cheesecake pan with little removable bottoms. I tried this recipe with other regular molds and they just fall apart without the removable base.
It also really helps having a very simple piping kit, but a simple ziploc baggy works great also!


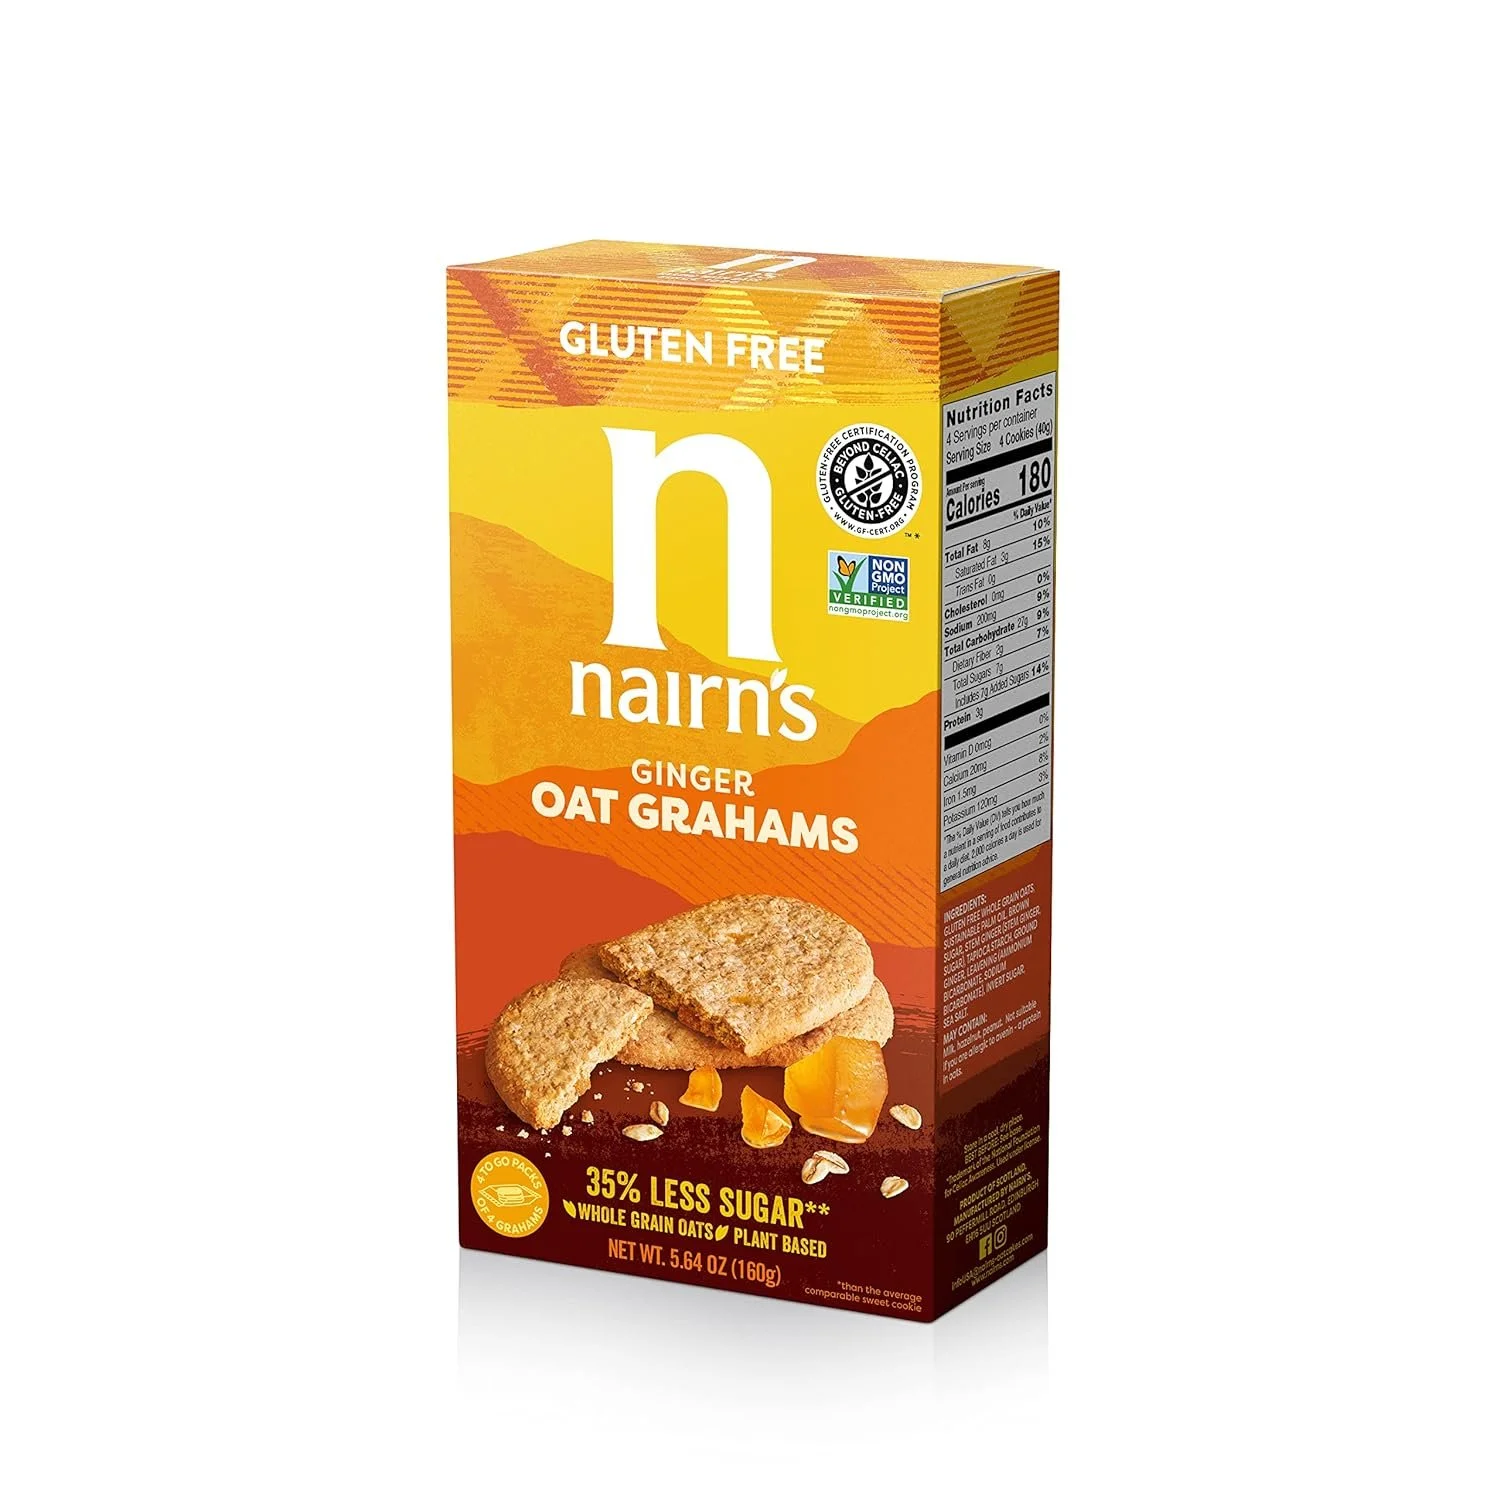
For the graham crust, we bought some pre-made cookies and crushed them. Our favorite was this ginger oat cookie base [Nairn nut-free gluten-free low-sugar], but you could always find or make your own!
Simplest Version:
Cookie Graham Cracker base
1/2 cup cookie crumbles (100 g), about half a package of Nairn cookies
3.5 Tbs butter or coconut oil (50g), melted
No-bake Cheesecake Filling
1/2 cup cashew butter (4.4 oz, 125 g)
you can also make your own by soaking cashews overnight (1 cup cashews with double height in water, then strain and blend. Speed up this process by letting the cashews soak for 15 minutes in boiling water, then blend, adding water as needed to form a nice flowy base)
1 cup cream cheese (8 oz, or one stick), vegan is okay
2/3 cup maple syrup or powdered swerve icing sugar (75g)
3 Tbs heavy cream
or coconut cream, 50g
or whole fat yogurt, reduced to 2 Tbs
1 vanilla bean, seeds scraped, or 2 teaspoons of vanilla extract
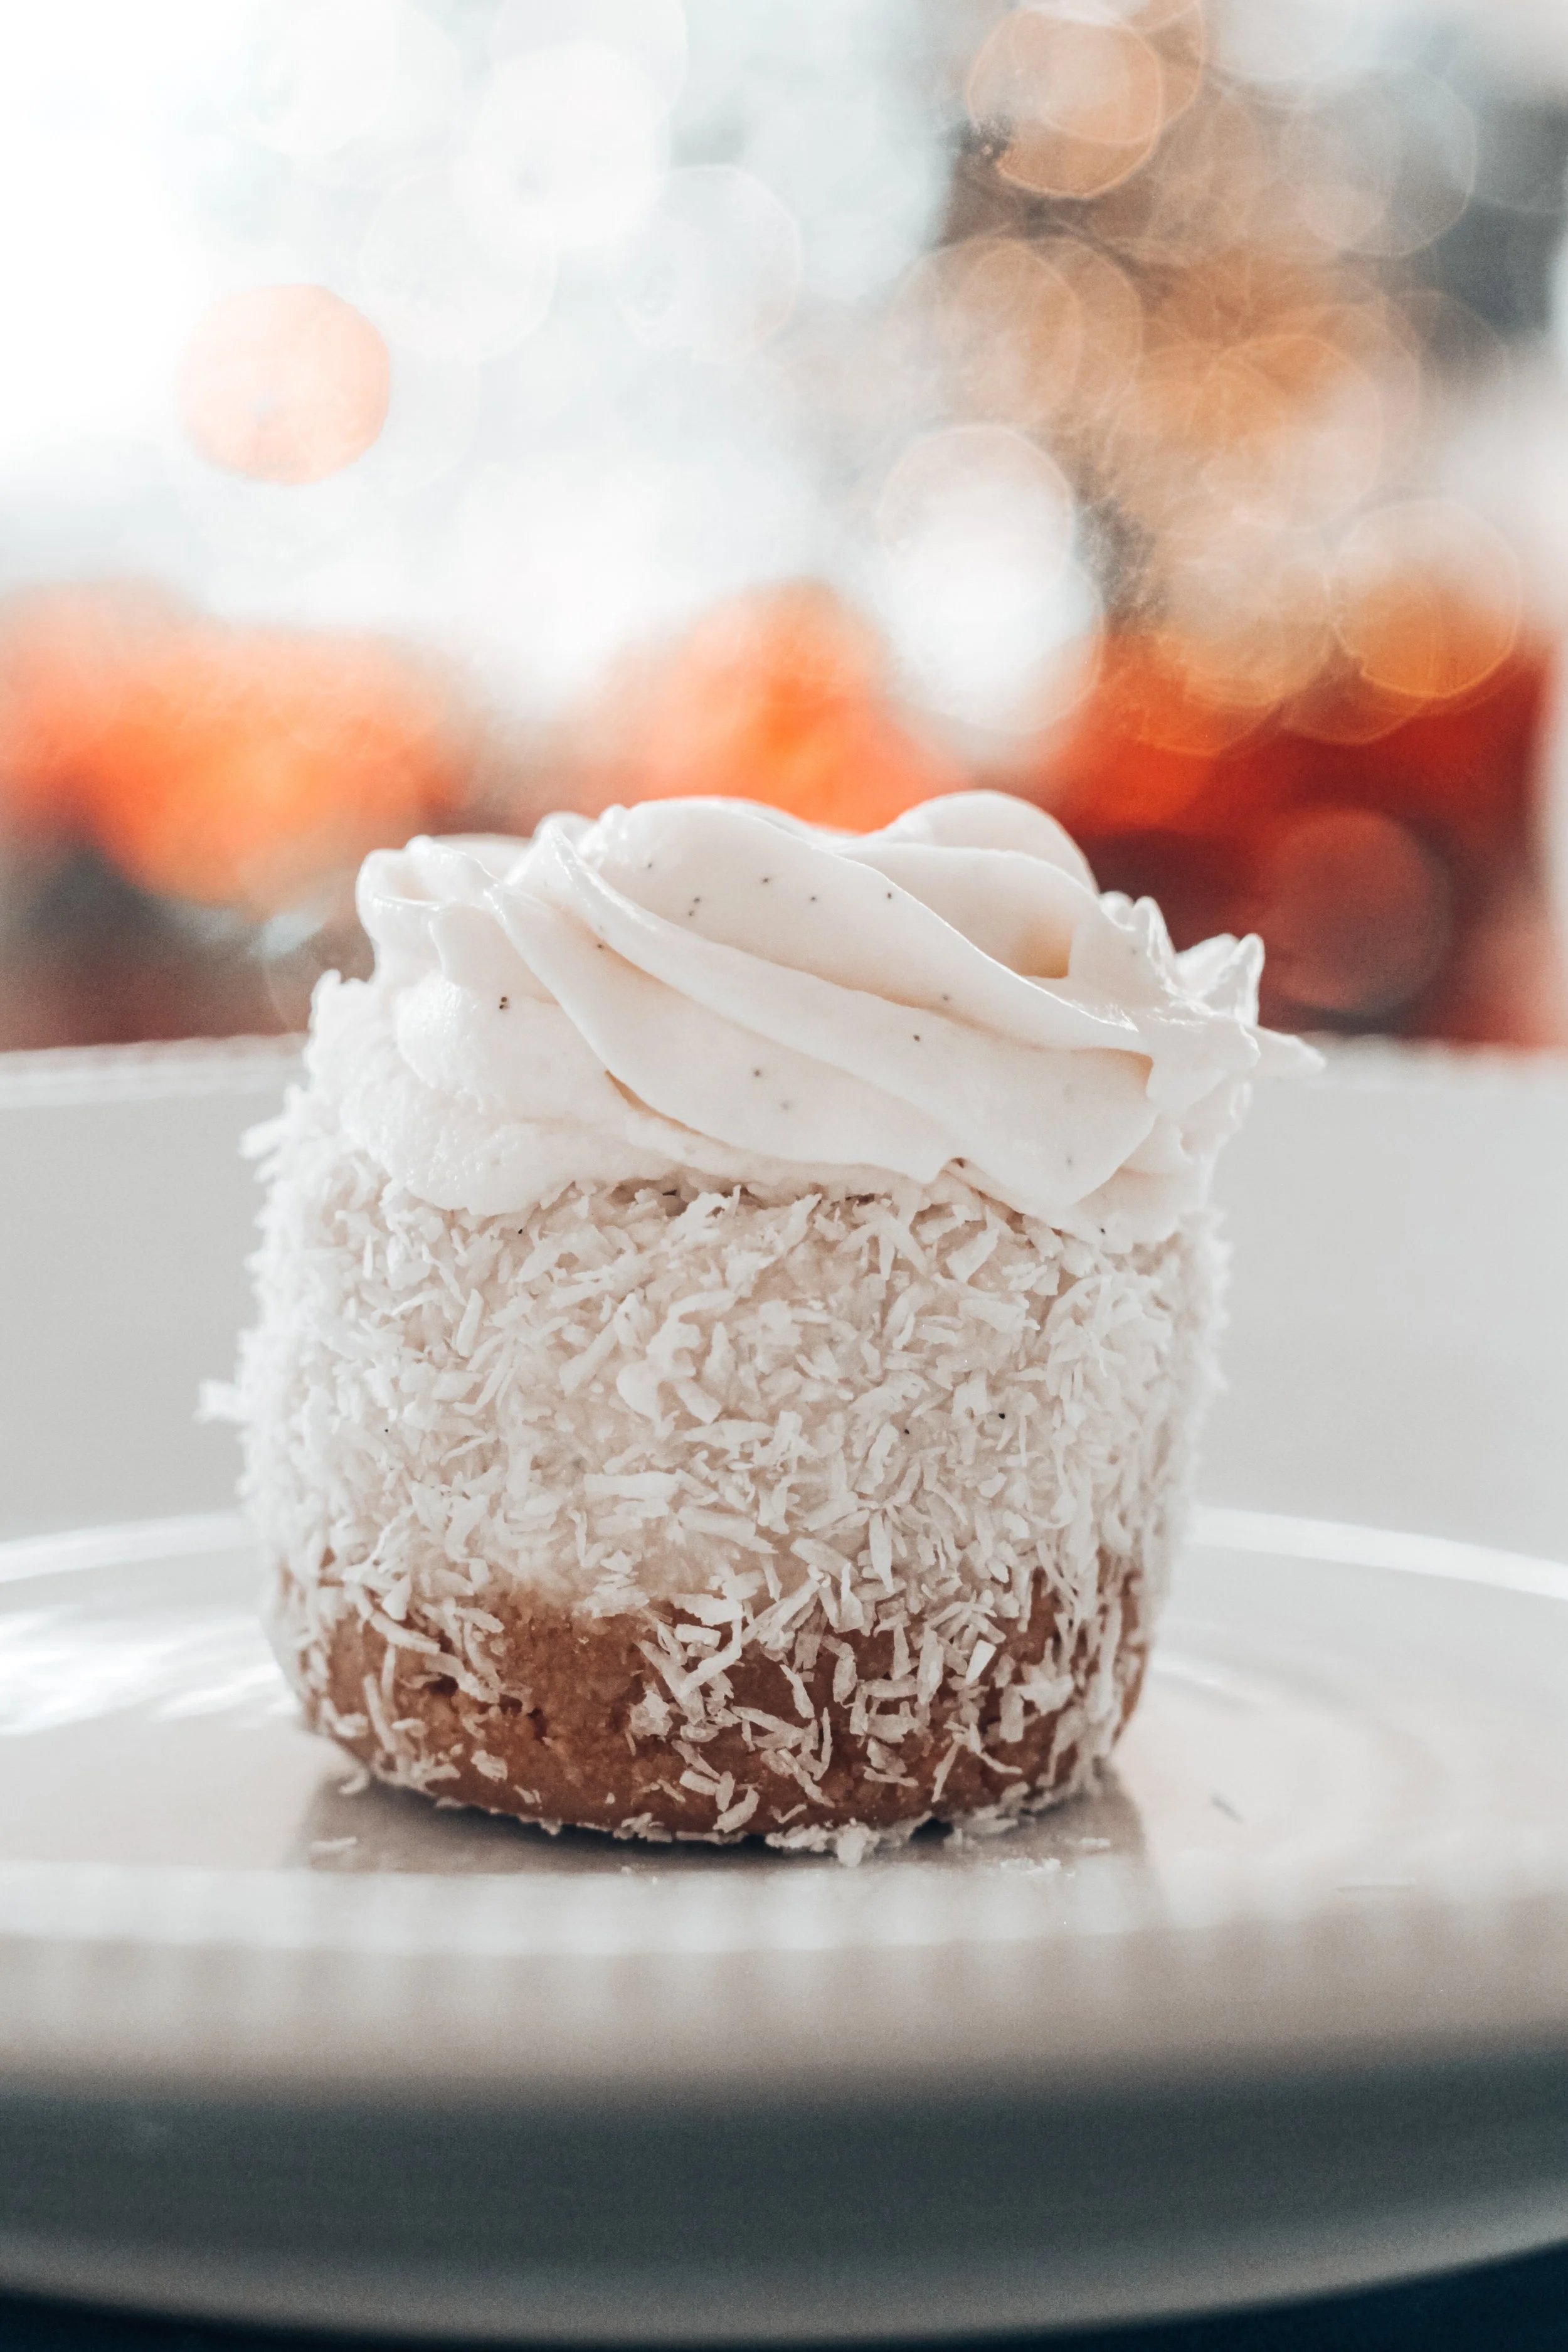
1/2 cup shredded coconut (50g, for rolling as decoration)
Whipped cream Frosting
1 cup heavy whipping cream
2 Tablespoon powdered swerve sugar
1 vanilla bean, or 1 tsp vanilla extract
4 oz (1/2 block) cream cheese, softened to room temperature
Decorations
large + mini marshmallows (I use the brand ‘Dandies’)
Follow my recipe to make your own with real marshmallow root!
sugar-free dark chocolate
Black food gel (chocolate base)
Prep (Night Before):
If making own cashew butter, soak the cashews before use – Allow the cashews to soak in a bowl of water for a few hours before use or overnight.
If making own marshmallows, soak 1/2 cup marshmallow in cold water overnight, 8 hours or so.
Instructions (Day of):
Totally optional: If making, start on the marshmallows
Cookie Base
Melt the butter/coconut oil.
Crush the cookie base, with a roller or in a food processor/blender until very fine powder.
Pour the biscuit crumbs into the melted butter/coconut and stir together using a wooden spoon or spatula. It should resemble wet sand, and when you press it between your fingers, should hold its shape. Press approximately 1 & 1/2 tablespoon of mixture into each loose base cookie cup tin, making sure to compact it in using clean hands. The more compact it is, the less likely it will crumble.
Place into the freezer while you make the filling.
Cheesecake filling
Blend the cashew butter (if fresh).
Drain the cashew nuts from the water and place them into a food processor/blender (then add the rest of the filling in the same blender).
Cut the vanilla bean
In a large bowl (or same blender as above), add in the cream cheese and syrup/swerve icing sugar, and vanilla.
Equally pour the mixture into each tin, making sure to tap the cheesecakes onto the worktop to remove any air bubbles.
Place into the fridge about 8 hours or overnight to set.
Once set, remove from the fridge, and push out the cheesecake (as the base is loose bottomed). To make it easier, place the tin into the freezer for 15 minutes to help firm up the cheesecakes, then slide a knife around the edges of the cheesecakes to help loosen them from the tin. Making the cheesecakes firmer will help push them out the tin and won’t damage them.
Method (decorations)
Sprinkle some desiccated coconut onto a plate. Roll the sides of the cheesecakes in the coconut to coat (only do this when the cheesecakes are firm / right out the fridge as when they’re soft, it’ll be very hard to roll)
In a stand mixer with balloon whisk attachment or hand whisk, whip up the dairy-free cream until thick and holds a peak. Transfer into a piping bag fitted with a open star tip nozzle.
Pipe a swirl of cream on top of each cheesecake.
Make the polar bears : Cut a large marshmallow in half, then cut one of the halves in half (these are for the ears). Use a-little water to stick the ‘ears’ to the top of the polar bear head. Use a mini white marshmallow and stick to the front (this is for the nose).
Melt the dairy-free dark chocolate along with a drop of black food gel. Transfer into a piping bag and snip off the tip.
Pipe the nose and eyes to the polar bear. Place the poler bear head onto the cheesecake, on top of the cream swirl.
You could stop here, or make the adorable polar bear paws with more cut marshmallows, with piped paws on. Place two into the cheesecake on the sides and two for the feet.
Serve with a light sprinkle of snow (icing sugar). Serve and enjoy.
Whipped Cream Frosting
Before getting started, place your mixing bowl and beaters in the freezer for 5 to 10 minutes to chill. Once chilled, remove the bowl and beaters from the freezer.
In the bowl of a stand mixer fitted with the whisk attachment, or in a large mixing bowl using a handheld mixer, add the heavy whipping cream, cream cheese, powdered sugar, and vanilla extract. Start mixing on low speed. Once the mixture starts to increase in volume, increase the speed to medium-high until stiff peaks form.
Tips for blending the vanilla cake part in the Vitamix (wet container):
Add ingredients in this order for best blending:
Cashew butter (or blended cashews) first
Heavy cream next (this helps things move)
Cream cheese, broken into chunks
Maple syrup/sweetener
Vanilla last
Begin on variable speed 1, then gradually increase to 5-6. Stop once or twice to scrape down the sides, and be prepared to use the tamper to push ingredients down into the blades.
You can also use the paddle attachment on a stand mixer
Alternate base (nut free)
Oat-Based Graham-Style Crust (Most Traditional Texture)
This will give you that classic graham cracker snap and flavor:
Ingredients:
1 cup rolled oats (blend into flour, or use oat flour)
2 Tbs coconut flour
1 Tbs arrowroot flour
2-3 Tbs maple syrup or honey
1/4 tsp cinnamon
Pinch of salt
3.5 Tbs melted butter or coconut oil
Method:
Blend oats into a fine flour (or use pre-made oat flour)
Mix all dry ingredients together
Add maple syrup/honey and melted butter, mix until it resembles wet sand
Press firmly into your mini cheesecake pans
Optional but recommended: Bake at 325°F for 8-10 minutes to crisp up before filling (let cool completely)