
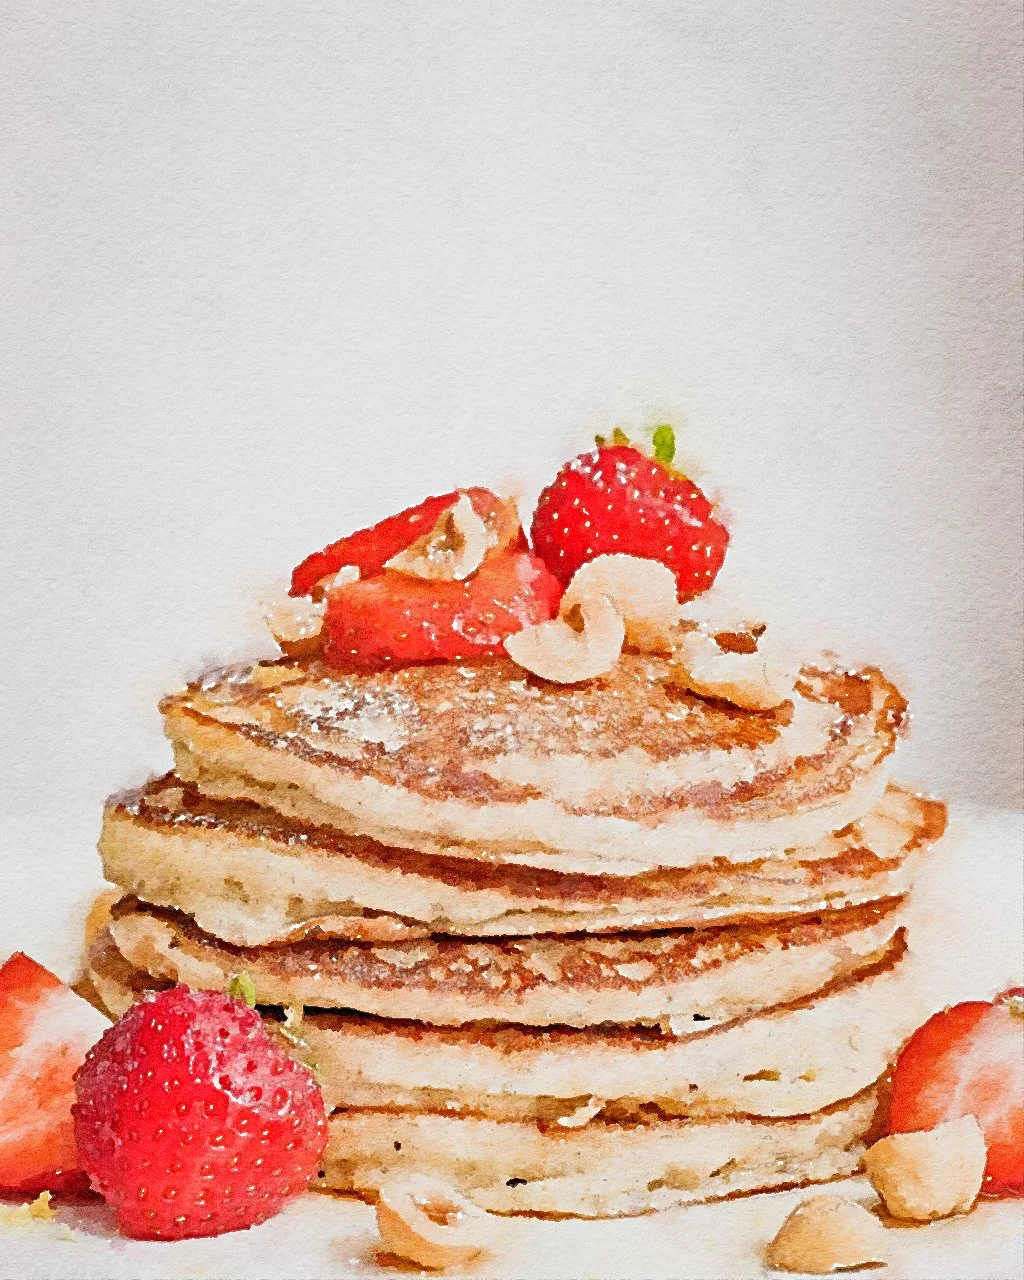
Vegan Hazelnut Pancakes
The hazelnut flower brings these to a darker pancake, but they taste like dessert! Unlike other flours that taste chalky, this was incredible.
INGREDIENTS
2 Tbsp ground flax seed
6 Tbsp water
1/2 cup full-fat coconut milk
2 cups hazelnut flour (or almond flour, equal amts)
2 Tbsp tapioca flour, or arrowroot (equal amts)
1 tsp baking powder
1 pinch sea salt
OPTIONAL ADD-INS:
1 tsp pure vanilla extract
1/2 tsp ground cinnamon
INSTRUCTIONS
Stir together the ground flax seed and water in a bowl. Allow this mixture to sit for 10 to 15 minutes, or until it thickens to the consistency of a beaten egg. Note: I like to stir the flax mixture every few minutes to make sure it has a uniform consistency and doesn’t clump up.
Add in the coconut milk and vanilla extract and whisk until well-combined. Add in the remaining (dry) ingredients and stir well until a thick pancake batter forms.
Heat a non-stick skillet or griddle to medium-low heat and add just enough coconut oil or avocado oil to coat the surface.
Measure out ¼ cup of pancake batter and transfer it to the hot surface. Note: the batter will be very thick, so use your finger to form a circular pancake shape in the batter, as it will not spread on its own.
Cook for 2 to 3 minutes, or until the sides of the pancake firm up and the center appears to be set up as well. Carefully flip and cook an additional 2 to 3 minutes. Flip a third time, and continue cooking another 1 to 3 minutes, until the pancakes are fully cooked through the center. Note: If the pancakes are still "raw" in the center after a 4th flip, finish them off in the microwave for 10 to 30 seconds.
Serve pancakes with choice of toppings, and enjoy!
Alternative buckwheat pancakes:
STEWED CHERRIES (optional as fresh cherries will work too!)
2-3 tbsp maple syrup
about 2 cups of cherries, pitted
BUCKWHEAT PANCAKES
1 cup / 125 g buckwheat flour*
2 tbsp raw cacao powder
½ tsp gluten-free baking powder
½ tsp gluten-free baking soda
3 tbsp aquafaba** recipe below
2-3 tbsp maple syrup
2 tsp lemon or lime juice
¾-1 cup of any plant milk (if using full fat coconut milk, dilute with 50% water)
neutral tasting oil, for frying
METHOD
STEWED CHERRIES (optional)
Put cherries in a small pot with a splash of water and some maple syrup. Stew the cherries on a very low heat, stirring them from time to time until they soften and release their beautiful juice.
Once the cherries soften, remove them from the pot and set aside. Return the leftover cherry juice to the stove and reduce it on a very low heat so that it becomes a bit more like a syrup.
BUCKWHEAT PANCAKES
In a mixing bowl, combine buckwheat flour, baking soda, baking powder and cacao powder.
In another bowl, combine all wet ingredients: ¾ cup plant milk, maple syrup and lemon juice. Whisk everything together until combined.
Pour wet ingredients into dry ingredients, stirring until you get a homogeneous mixture.
In another bowl whisk aquafaba with a hand whisk until it’s all frothy and has lots of small air bubbles – no need to use an electric whisk here, just give your arm a bit of a workout .
Fold whipped aquafaba into the pancake mixture. Check the consistency of the batter, if it’s too thick, add another splash of plant milk.
Heat up a frying pan on medium heat (that’s important! I used setting 3 out of 6). Brush the pan with a bit of oil using a brush or an oil spray.
Ladle 2 tablespoons of the pancake mix per pancake. Keep cooking each pancake until lots of little bubbles form on its surface. Let the bubbles burst before flipping the pancake to the other side (if you flip them before the bubbles burst the pancakes will be raw in the middle).
Once the bubbles burst, flip each pancake gently. Fry them for a minute or two on the other side. Arrange cooked pancakes in a stack to keep warm. You can cover the stack with a piece of aluminium foil or keep it in a warm oven while making the rest.
Serve with stewed cherries and cherry syrup on top.
NOTES
* You can make your own flour by milling raw (that’s very important! You don’t want toasted buckwheat as the taste is very different) buckwheat groats in your coffee grinder. They are quite soft before they get toasted so even a not so powerful coffee grinder will make you heaps of buckwheat flour in seconds…
Homemade Aquafaba – Vegan Egg Replacement
INGREDIENTS
2 cups of dry chickpeas
8 cups of water
METHOD
Soak dry chickpeas in plenty of water (chickpeas should be well covered) for about 8 hours. I tend to leave them to soak overnight.
Discard soaking water and rinse the chickpeas. Place them into a pot, which you have a lid for and cover with 8 cups of water. Do not add any salt or baking soda.
Cover the pot with a lid and bring to the boil. Be careful as chickpeas like to boil over if the heat is too high so keep an eye on them until they come to boil. Skim the foam that has come to the top and discard.
After the chickpeas come to boil, decrease the heat to low-medium and simmer the chickpeas (with a lid on) until tender. It takes about 60-75 minutes.
Once the chickpeas are ready, turn the heat off and leave the chickpeas to cool down in its cooking water (this infuses the cooking water with more protein, which gives aquafaba its miraculous properties of an egg white).
Remove chickpeas from the cooking water with a slotted spoon. Make sure the spoon is clean and has no grease residue on it as even trace amounts of grease inhibit aquafaba’s foaming properties – this is especially important if you intend to whip your aquafaba into a meringue.
Depending on the intended application of your aquafaba, you may want to reduce the liquid a little to make it more potent. I find that this is especially necessary for when you intent to use it as a binder, in vegan meatballs for example. Please remember also that the more reduced the liquid the more intense chickpea flavour will be so when you intent to use it for desserts, like meringues or chocolate mousse, you do not need to reduce as much or at all. To reduce aquafaba, return the remaining cooking water to the stove. Set the heat to low-medium and reduce aquafaba (without a lid) for about 30-45 minutes until some of the water evaporates and you are left with thick yellow liquid.
Let the reduced liquid come to room temperature and then transfer to a clean container and store in the fridge – once chilled aquafaba will turn gelatinous and resemble an egg white. If you are not in a rush to use your aquafaba, pop cooked chickpeas back into the container with aquafaba and store them together overnight – this will make aquafaba even more gelatinous. Store in an air-tight container for 3-4 days.